Add Breadcrumb Navigation To Blogger Blogs

I came across the breadcrumb navigation trick for blogger during its inception. But, I thought there is no use adding such a widget other than improving the navigation. The navigation simply can be improved by adding a blog archive or using the labels widget in blogger. But, I found that apart from improving the navigation it also facilitates Search Engine Optimization. Basically, the search engines view a breadcrumb as a text link to posts and provides importance to the subject of the linked page.

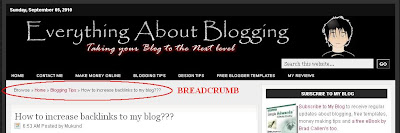
To basically understand this, I should define what a breadcrumb is??? To keep it simple, a breadcrumb is a widget like stuff that displays the visitor's location within a blog. Basically, it improves the navigation for a blog and helps the visitor easily jump from one part of the blog to another. To have a better understanding of what I am blabbering, please have a look at the following screen shot.
breadcrumbs-for-bloggerLet us now install this hack to improve our SEO and site navigation. Just follow the simple steps given below.
1. Go to "Design->Edit HTML. Make a backup of your template before modifying the HTML by clicking on the "Download full template" link at the top of the page.
2. Search for the following line in your template. Use "CTRL+F" to fasten your search.
]]></b:skin>
3. Add the following piece of code just above the line mentioned in step 2.
.breadcrumbs
{
float: left;
width: 590px;
font-size: 11px;
margin: 5px 10px 20px 10px;
padding: 0px 0px 3px 0px;
border-bottom: double #EAEAEA;
}
4. Save your template. Just make sure that your template is expanded. Click on the "Expand Widget Templates". Now, search for the following piece of code in your expanded template.
<b:includable id='main' var='top'>
5. Replace the following block of code with the code mentioned in this text document - "Breadcrumb For Blogger".
<b:includable id='main' var='top'>
<!-- posts -->
<div class='blog-posts hfeed'>
<b:include data='top' name='status-message'/>
<data:adStart/>
6. Save your template. That's all folks!!!

Visit any of your post page and enjoy the hack!! If you still face any problem regarding this widget, I am always ready to help you via mails. Even comments below the post will do!! For all those who had a smooth installation, just enjoy the hack!!!

Add A Stylish Scrolling Sidebar Widget In Blogger

Last night, when I was browsing for information about making blogger blogs look more stylish and professional, I found a beautiful widget that will scroll along the page as and when you scroll up or down. What attracted me, is the gliding movement of the widget to display the important links for your blog. You may use this widget to display some of the best posts in your blog or some important links. Look at the red box in the picture below. If you are still confused, please have a look at the demo in my test blog by clicking here - Stylish Scrolling Sidebar Demo.
stylish-scrolling-sidebarI am pretty sure everyone would love to add this widget in their blog. There are lots of customizations with this widget. For example, you may ask the advertisers to place their ads in this widget or display your social networking links. The only disadvantage is that, it will take a little bit of time to load since it works on a JavaScript. Any way, let us get to our work by installing this stylish widget in our blogger blogs.

1. Go to "Design->Edit HTML. Make a backup of your template before modifying the HTML by clicking on the "Download full template" link at the top of the page.
2. Search for the following line in your template. Use "CTRL+F" to fasten your search.
<body>
3. Download the text document - Stylish Scrolling Widget For Blogger Blogs.
4. Now, open the text document, copy the entire code and paste it just below the line you searched in step 2.
5. Change the code that says "Your Link 1, Your Link 2 and so on" with the links you wish to display in your blog. You may even change the text "USEFUL LINKS" with some other name, which gets displayed in the widget on hitting the "CLICK HERE" tab.
(Note: For any other customization with this widget, please feel free to leave your comments and I will help you customize them as per your request.)
6. Save your template and view your blog. You will find the widget installed successfully.

I made this post as simple as possible. I hope you enjoyed this post. As I said earlier, feel free to leave your comments here. You may even add the codes using the "HTML/Javascript" option in the "Design->Add Page elements" page. So, just give this widget a try!!
If any links are broken or any other problem you face with your blog, you can always reach me through my email id at smalwayz@gmail.com or via comments!!

Add a Stylish Three Column Footer in Blogger

It is pretty common that you might have seen all the professional blogger templates would possess a three column footer where in, they add details about their site or an about me widget and lots more. I recommend you to add this feature in your blog to make it more professional. You may scroll down the page to have a look at the bottom of the page to have a look at this widget which contains Popular Posts, Useful Resources, Blog Archive and Recent Comments. Hope, you got an idea about what a three column footer is.
Three-Column-FooterTo add this stylish three column footer to your blog, just follow these simple steps. As we always ensure safety, the first step would be to back up your template. To do this, simply navigate to "Design->Edit HTML and make a backup of your template clicking on the "Download full template" link at the top of the page. Once the back up is over, follow these simple steps.

1. Search for the following text in your blogger template. To fasten your search, use "CTRL+F".
]]></b:skin>
2. Download the following text document : Three Column Footer One. Just paste the code in the document above the line mentioned in step 2.
3. Search your template for the following text.
</body>
4. Paste the following piece of code above it.
<div id='footer-wrapper'>
<div id='lower-wrapper'>
<div id='lowerbar-wrapper'>
<b:section class='lowerbar' id='lowerbar1' preferred='yes'>
</b:section>
</div>
<div id='lowerbar-wrapper'>
<b:section class='lowerbar' id='lowerbar2' preferred='yes'>
</b:section>
</div>
<div id='lowerbar-wrapper'>
<b:section class='lowerbar' id='lowerbar3' preferred='yes'>
</b:section>
</div>
<div style='clear: both;'/>
</div> </div>
(Note: You may paste the above code in the place where you want the footer to appear. It is ideal to place this section before the credits section in your blog.)
5. Now, save your template and your ready with the footer section. Add any widget you want. Feel free to comment or contact me via Email for any assistance that you need to install this feature. I would be happy to help you!! See you soon in my next post!!!

Add A Sliding Featured Content To Your Blogger Blog

I hope every one had a look at the "Magazine" type Word press templates that have a special feature namely, sliding featured content. This feature has been incorporated by default in blogger templates, like the Mahusay blogger template. Many readers personally requested me on "How to install this widget in their blogger templates?". So, this post basically explains how to install the sliding featured content on your blogs. Have a look at the snapshot of the widget installed in my blog.
sliding-featured-content-for-bloggerFollow these simple steps to display this beautiful Sliding Featured Content.
1. Login to your dashboard. Navigate to "Layout>>Edit HTML" from your dashboard. Make a back up of your template before you do any changes in the current template.
2. Search for the following line in your blog. You may use "CTRL+F" to do the search.
</head>
3. Download this: Text Document One. Now, Open the text document and paste the code present in it on top of the line mentioned in step 2.
4. Now, search for the following piece of code in your blog using "CTRL+F".
<div id='main-wrapper'>
5. Download this: Text Document Two. Open the text document. This is the major part of this widget, pretty difficult task too. You need to customize the HTML lines mentioned in that document. Check out the first block of code. You will find "YOUR TITLE". Replace it with the title of your post. Next, replace "SHORT DESCRIPTION OF YOUR POST" with a short description of your post, say 30-40 words. Replace "LINK OF YOUR POST" with the URL of your post.
6. Now, you will find a phrase like this "LINK OF YOUR POST PHOTO". You need to replace that phrase with the URL of your photo. I mean, a photo that is related to that particular post. The most important thing to note is that you should make sure, the photo size is 600x200, that is the width should be 600 and the height should be 200. You can use Adobe Photoshop or any other tool to resize the photos. Once, you are done with the photo. Upload the photo to a hosting website like Imageshack or Photobucket and get the link to your photo. As mentioned earlier, replace "LINK OF YOUR POST PHOTO" with the link you obtained. Huh!! Job done at last.
7. Repeat the same steps (5 and 6) for the other blocks too. I set the number of blocks(imageElement blocks) to four in that document. But, it is your wish. You may include as many blocks as you want. Once, you finish of all the editing business, paste the entire code below the line mentioned in step 4.
NOTE: "If it is very confusing, then download this Sample Text Document to have a look at the code that I installed in my blog to make this widget working. May be, you will have an idea of what I was blabbering. Laughing Out Loud!!!"
8. Now, preview your template. If any error, try to rectify it or else, contact me and I will help you out. No errors??? Then, save your template. Go check out your blog with one of the coolest widgets installed in it.

I made this post as simple as possible so that people feel it easy to install this widget and they will give it a try. It is not that only professional and high quality blogs can facilitate this of a widget. Even small scale blogs can use HTML effectively and make it more appealing. Please leave your comments if you face any difficulty in installing this widget.

Recent Posts Widget For Blogger With Thumbnails

I received few comments in my blog and one of my readers requested a "Recent Posts" widget. To start off there are 2 methods to include this widget in your blog. One method will use the feed of your blog, just like the "Recent Comments" Widget explained in my previous posts. Since, the first method is very simple and self explanatory. I would like to skip this method and move on to the second method. This method includes a thumbnail of your recent posts and also displays the number of comments for that particular post as shown in the demo - Indian Food Recipes.

This post basically features about adding this type of widget to your blog. Follow these simple steps to install this widget on your blog.
1. Login to your blogger account and navigate to "Layout>>Page Elements". Click on "Add a Gadget" and select "HTML/JavaScript".
2. Copy the following code and paste in the pop up window that appears.
<center>
<script language="JavaScript">
imgr = new Array();
imgr[0] = "http://i43.tinypic.com/orpg0m.jpg";
imgr[1] = "http://i43.tinypic.com/orpg0m.jpg";
imgr[2] = "http://i43.tinypic.com/orpg0m.jpg";
imgr[3] = "http://i43.tinypic.com/orpg0m.jpg";
imgr[4] = "http://i43.tinypic.com/orpg0m.jpg";
showRandomImg = true;
boxwidth = 298;
cellspacing = 8;
borderColor = "#ffffff";
bgTD = "#000000";
thumbwidth = 40;
thumbheight = 40;
fntsize = 12;
acolor = "#666";
aBold = true;
icon = " ";
text = "comments";
showPostDate = false;
summaryPost = 40;
summaryFontsize = 10;
summaryColor = "#666";
icon2 = " ";
numposts = 5;
home_page = "http://YOURBLOGNAME.blogspot.com/";
</script>
<script src="http://xrl.us/bezqwo" type="text/javascript">
</script>
</center>
3. Change the code highlighted in green. That is, replace "YOURBLOGNAME" with the URL name of your blog. After you change the name, simply save the changes. Have a look at your blog with this cool widget installed in it!!!

Recent Comments Widget For Blogger

One method to show off the power of your blog is by displaying the recent comments. I said to show off the power because only when you have some loyal readers, they will comment on your posts genuinely and by that way, you show the power of your blog. This post basically features on how to add recent comments widget for blogger blogs. There are 2 methods to include this widget to your blog. Both the methods are very simple and are explained below.

The first method is using the feed. Follow these simple steps to include this method of recent comments to your blog.
1. Login to your blogger account and navigate to "Layout>>Page Elements". Click on "Add a Gadget" and select "Feed". The picture below will explain you this step more clearly.choose-feed
2. Paste the following code in the window that pops out.
http://YourBlogName.blogspot.com/feeds/posts/default
Note: Replace "YourBlogName" with the URL name of your blog. Example: For my blog, it is "newbloggingtipz"
3. Select the "Save Changes" button and view your blog.

The second method is using the HTML code. Follow these simple steps to include this method of recent comments to your blog.
1. Login to your blogger account and navigate to "Layout>>Page Elements". Click on "Add a Gadget" and select "HTML/JavaScript". Take a preview of what I am saying below.choose-html-javascript2. Download this text document. Open the text file and copy the code in it and paste in the pop up window, that appeared in step one.
3. Scroll to the end of the code in it. Find the following line in that code.
src="http://YourBlogName.blogspot.com/feeds/comments/default?
4. Replace the code highlighted in green with the URL name of your blog as explained in the previous method(Refer Step 2).
5. Select the "Save Changes" button and view your blog.

The first method will allow you to display only the comments and will show dates and other stuff while the second method will show all such details. Moreover, you can customize the way the comments are displayed in the second method if you know HTML to some extent while the first method offers no customization. So, enjoy this recent comments widget. See you later in the next post.

Add Related Posts To Blogger Blog

I recently came across few comments in my blog that the previous post about related posts was not working in few blogger blogs. Moreover, the previous "Related Posts Widget" displays all the related posts based on category and displayed the labels of each one of them but, the one in this post will only display the specified number of posts and will not show any labels. Take a preview of the final output.related-postsThis post basically features an alternative method to show the related posts in your blog. Follow these simple steps to add this widget to your blog.
1. Navigate to "Layout>>Edit HTML" from your dashboard. Make a back up of your template before you do any changes in the template.
2. Search using "CTRL+F" for the following line:
</head>
3. Download this first text file. Open the text file and insert the following piece of code just before the above line.
4. Now, expand your template, that is, make sure that you have a tick mark in that "Expand Widget Template". Now, do a search using "CTRL+F" for the following line:
<data:post.body/>
5. Download this second text file. Open the text file and insert the following piece of code just after the above line.
6. Now, Save your template. Preview each of your posts separately. If you still have any problem in downloading the file or with the code, then please leave a comment.

UPDATE: Check the latest version here - Stylish Related Posts.

Add Google Talk To Your Blog

I think everyone know, what is Google Talk? Google Talk is service that provides to send instant messages, make voice calls to PC's, transfer files, etc... People who sit for more hours in front of their PC's will like this widget especially blogs related to my niche(blogger tips, who need help in figuring out the correct HTML code). I say more hours with PC because, you include this widget basically to show that your online and any help required by the reader can be solved instantly through chat rather than leaving comments and other stuff.

This post basically features about including this widget to your blog. You just need to follow some simple steps in order to include this widget to your blog. Follow the steps as mentioned below:
1. As always, you need to back up your template before making any changes in the code. Navigate to "Layout>>Edit HTML" from your dashboard and download the template.
2. Now, Navigate to "Layout>>Page Elements" page. Click on "Add a Gadget" and select "HTML/JavaScript". Take a preview of what I am saying below.choose-html-javascript3. Paste the following piece of code in the window that pops out.
<iframe width="234" frameborder="0"
src="http://bit.ly/11fXeU"
height="350">
</iframe><p style="margin:-8px 0"><br /><center>
<a style="text-decoration:none;font-size:70%;" href="http://bit.ly/VYZga">Add to your blog</a></center></p>
4. Now, save your code and take a look at your blog.

Add 125x125 Ad Spots To Your Blog

Presently, the best ad format for a blog is 125x125. You may check out great blogs like ProBlogger, BloggerBuster, etc... These people use 125x125 ad spaces mostly rather than any other ad format. These dimensions are very perfect to display text and banner ads attractively and more over, they remain in the side bar permanently and do not interfere much with the blog's content.

Follow these simple steps to include an Advertise Here banner as shown in my blog.
1. Create a post specifying the importance of advertising in your blog. This should include an approximate amount of page views per month in your blog. You may also include Google page rank, Alexa rank and other stuffs which you feel will convince the advertiser.
2. As always, you need to back up your template before making any changes in the code. Navigate to "Layout>>Edit HTML" from your dashboard and download the template there.
3. Now, Navigate to "Layout>>Page Elements" page. Click on "Add a Gadget" and select "HTML/JavaScript". Take a preview of what I am saying below.4. Paste the following piece of code in the box that appears.
<a href="YOUR BLOG DETAILS URL"><img border="0" width="125" src="http://img60.imageshack.us/img60/2389/advertisehere.gif" height="125"/></a>
5. Replace "YOUR BLOG DETAILS URL" with the post URL that you made in step one. That is it. Now, save your code and take a look at your blog.

You may use these banners too instead of the one used in my blog.
| Banner One | Banner Two | Banner Three |
Click on each of the links and view the banners. Note: To change the banner image, you need to change the URL pointing to the image and not the link pointing to your site. That is, replace following code:
src="http://img60.imageshack.us/img60/2389/advertisehere.gif"
with the following code for the "Banner One" link
src="http://img198.imageshack.us/img198/9649/advert125x125.png"
Look at the URL carefully, it has been changed. So, you just need to change the URL and nothing else is required. Come on bloggers!! Add this widget to your blog too and show the advertisers that your blog is worth advertising!!!

Add Email Subscription Form Below Your Blogger Posts

I recently noted the amount of subscriber's count has increased by a small margin in my blog because of the inclusion of an email subscription form below each of my blogger posts. So, I thought why not help other bloggers also to put a form like mine in their blogs and improve their subscriber's count too. So, this post basically features how to add an email subscription form below every blogger post. Moreover, you can add some interesting text like the one seen in my blog that will attract a lot of readers.

Simply, it is a modified or customized email subscription form that will help your reader's subscribe to your blog easily rather than searching where the subscribe icon is in your blog. I think it is enough of explaining about this stuff because everything is explained clearly in that picture above. That will be the final output after making the changes in our HTML code.

Let me straight away list out the steps in including this widget to your blog.
1. As always, you need to back up your template before making any changes in the code. Navigate to "Layout>>Edit HTML" from your dashboard and download the template there.
2. Now, expand your template, that is, make sure you have a tick mark in that "Expand Widget Template". Now, do a search using "CTRL+F" for the following line:
<div class='post-footer-line post-footer-line-1'/>
3. Download this Text Document. Open the text file and insert the following piece of code in it just after the above line.
4. Change the feed name ("EverythingAboutBlogging" to YOUR BLOG FEED NAME) from my feeds to your feed. You need to find that from FeedBurner's Email Subscription Form which is self explanatory.
5. Preview your template to check for any error in code. If you find errors, then redo the steps again from the first else save your template. If you have any problem in downloading the file or with the code, then please leave a comment.

Display Top Commentators In Blogger

I recently came across this widget from my friend's blog that displays the top commentators in blogger. This is one good technique to show that your blog has got some influential readers. You may frequently see this in WordPress blogs, but not in blog spot, because most of them do not know what the HTML code is to display this widget. By displaying this widget, you encourage your loyal readers to comment more on your posts.

In order to setup this top commentators widget in your blog, you may just place this code in "ADD HTML/Javascript" in the layout's page. You may follow these steps to install the top commentators widget in your blog.
1. Navigate to your "Layout" page from the dashboard.
2. Click "HTML/JavaScript". Take a preview of what I am talking here.
3. Download the following text document - Top Commentators Widget
4. Now, place the code in the new window that appears. After you place the code, slight modification is to be done in the last but 2 lines of the code. You need to replace your nickname and your blog name. Simple!!!
5. Check for the following code in that line. Replace "NICKNAME" with some name of your choice and "YOURBLOG.blogspot.com" with the address of your blog. (Example:newbloggingtipz.blogspot.com)
&filter=NICKNAME&url=http%3A%2F%2FYOURBLOG.blogspot.com&num=10"
6. Once this is done. Just save it and you may preview your blog to see the final output.

Add Related Posts below every Blogger Post

One simple method to make your visitors stay long in your site is to add the related posts at the end of every post in your blog. This increases the number of page views and who knows, it may increase the page rank of your blog one day. There are many sites that provide widgets to display the "Related Posts" at the end of every page.

This post features the simplest method to implement the above objective by inserting a piece of code in your template. The code was personally verified and you may look at the end of my blogger posts for a preview. It works fine with both IE and Mozilla Firefox because, I see many people who complaint that certain HTML codes works well in Mozilla but not with IE.

Just follow these steps:
1. Navigate to "Layout>>Edit HTML" from your dashboard. Make a back up of your template before you do any changes in the template.
2. Now, expand your template, that is, make sure that you have a tick mark in that "Expand Widget Template". Now, do a search using "CTRL+F" for the following line:
<data:post.body/>
3. Download this text file. Open the text file and insert the following piece of code just after the above line.
4. Now, Save your template. Preview each of your posts separately. If you have any problem in downloading the file or with the code, then please leave a comment.

UPDATE: Check out the latest version of related posts here - Stylish Related Posts.
[netinsert=0.0.1.11.14.1]