Free Premium Blogger Templates - Grante

As I said in my previous post on Free Premium Blogger Templates, I have become more specific in choosing the blogger templates. But, with respect to this template namely, "Grante Blogger Template", I never had a second thought say whether to post it or not. This template is basically a two column template which was originally designed for Word Press. It was converted to blogger by "themecraft.net". You may have a look at the template by checking the screen shot below or click on the demo link to have a live demo of the template.
So, I would like to highlight few important features of this template. To start off, I would recommend this template to all the newbies who think of changing their template from the default blogger template because I feel this template gives a very good impression at its first look. Moving on to its features, it has got ready to use social bookmarking buttons at the right sidebar.

The template also provides an attractive RSS feed and twitter icon at the top of the blog, next to the search bar. This template provides only one navigation bar which is located below the title/header. Also, the "Read More" hack can be enabled for this template with ease. The only disadvantage with this template would be the footer section. I find this section missing in many of the blogger templates. How ever, we add one if you know a little about CSS and HTML coding. If not, just visit this link (Add A Stylish Footer To Your Blog) and you can add a footer in seconds.

Overall, I would recommend this template all the newbies and even the pro's to some extent. The template is feasible for changes in text type, font color, size and so on. These customizations would be little difficult for the newbies. However, the pro's would master this and make this template, the way they want. Hope you enjoyed this template and the upcoming series of "Free Premium Blogger Templates".

Free Premium Blogger Templates - Mimoza

For the past few weeks, I am working on the keyword "Free Premium Blogger Templates". So, you will find every template that is posted here with the heading as "Free Premium Blogger Templates" followed by the title of the template. It does not mean that I post some non sense under this category. I just want to convey my message that I have become more specific in choosing the templates which I post here. Today, I present to you one such specifically chosen premium blogger template namely, "The Mimoza Blogger Template".
Before I explain the features of this template, you may preview this template by having a look at the screen shot above or just click on the demo link to check out the live demo of this template. To start off, Mimoza Blogger Template is a two column blogger template. It includes features like the sliding featured content(click here to install featured content on your blogger template), default ad blocks, social bookmarking icons and so on...

I feel the two important features that make this template stand unique would be the sliding featured content widget and the social bookmarking icons. The color combination in this template is excellent. More over, the side bars, the post area and the the rest of the template have straight bends rather than curved corners which makes it more elegant and adds a professional touch to the blog. The template also provides two navigation menus, one above the header and the other below it, for better navigation.

The template, however, carries one disadvantage with it. As we saw in the Masunurin Blogger Template, this template also lacks a three/four column footer. How ever, you may add a three column footer to the template if you know little HTML coding and CSS for styling. If not, contact me and I will help you do the same. Just try installing this template and I hope you enjoy this template and the upcoming series of "Free Premium Blogger Templates".

Add "About the Author" Box Below Every Blogger Post

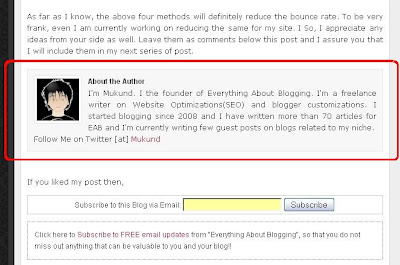
Hi friends!! I found a lot of Wordpress blogs that include an "About the Author " box/widget below every blog post. So, I thought why not provide the same for the blogger/blogspot blogs. If you had closely watched my blog posts for the past few days, you will find the "About the Author" box/widget installed below every blog post. This new hack will definitely helpful all those bloggers who have multiple authors for their blogspot blogs. If you still have a small confusion about the widget, then have a look at this screen shot below.
about-the-author-box-for-bloggerI hope you are clear about the widget now. If you like to install this widget on your blog, then please follow the following steps.
1. Go to "Design->Edit HTML. Make a backup of your template before modifying the HTML by clicking on the "Download full template" link at the top of the page.
2. Search for the following line in your template. Use "CTRL+F" to fasten your search.
]]></b:skin>
3. Add the following piece of code just above the line mentioned in step 2.
.author-box {
background: #F7F7F7;
margin: 20px 0 40px 0;
padding: 10px;
border: 1px solid #E6E6E6;
overflow: auto;
}
.author-box p {
margin: 0;
padding: 0;
}
.author-box img {
background: #FFFFFF;
float: left;
margin: 0 10px 0 0;
padding: 4px;
border: 1px solid #E6E6E6;
}
4. Save your template and check if it is error free. Now, expand your blogger template and search for the following piece of code in your blog template.
<div class='post-footer-line post-footer-line-1'/>
5. Download the following text document - About the Author Widget For Blogger. Open the text document and copy the entire code in it. Now, paste the code below the line mentioned in step 4.
(Note: Please write about yourself instead of the following text mentioned in the document, "Write About Yourself/Fellow Blogger Here!!!". Also, add your twitter name instead of the following text "YOURUSERNAME".)
6. Save your template. The code will automatically appear only in the post pages and will not be visible in the home page. Just go check out your individual post pages and you will find the widget installed.

I hope you enjoyed this post!! For any help, please feel free to leave your comments here!! I will sort out any of the issue with respect to this hack. Also, try spreading this post to your friends if you feel it is worth spreading:)

How To Reduce Your Blog's Bounce Rate?

slowing-bounce-ratesThis post basically explains the following questions: What are Analytics?? What is a bounce rate?? How vital it is?? How to reduce the bounce rate of your blog?? Once you build a website or a blog, your primary aim is to increase the traffic to it, in other words, you try to attract as many people as possible. This could be achieved by the adding your posts to various social bookmarking sites, participating in forums and so on.

Do you think, it is enough if we just increase the traffic to our blog??? Definitely not!!! You need to analyze the traffic or statistics(analytics) of your blog. So, What are Analytics? To keep it very simple, it is a tool to measure your site's performance. It displays various data regarding your blog and bounce rate is one such data. Most of the newbies install Google Analytics on their blogs but they do not know, how to interpret these data. I restrict myself to explain only about "Bounce Rate" in this post.

So, What is a Bounce Rate? Wikipedia defines it as, "Bounce rate is a term used in web site traffic analysis. It essentially represents the percentage of initial visitors to a site who “bounce” away to a different site, rather than continue on to other pages within the same site." I feel the statement is pretty self-explanatory.

To keep it very simple, bounce rate simply represents those percentage of visitors who move away to some other site after visiting a page on your website. You may find the percentage for "Bounce Rate" on the right corner below the graph once you log in to your Google Analytics Account. Higher the bounce rate, more the number of people leave your blog after a single web page visit.As per the definition, an ideal percentage of bounce rate would be zero. Practically speaking, a bounce rate below 60% is good for any blog. So, our only task is to make him/her stay in our blog or in other words, just get the second click out of the visitor. Though, it appears to be very easy, it is one such area that even probloggers constantly work upon.. I am pretty sure few ideas would have cropped if you clearly understood the post till this. You may implement your ideas but, do consider the following methods in reducing the bounce rate.

1. Clean Template: The first impression is always the best impression and you can gain that best impression only when your blog looks clean and tidy. It is not necessary that it should look very professional but, it should be clean. I mean the widgets should be placed properly, broken links should be updated and so on.

2. Quality Content And Keywords: Content is always the king!! So, it is very important that your blog provides quality content. Please, ensure that the keywords are relevant to the content of your blog. It is important that both the keywords and content go hand in hand or else you end up providing the wrong information to the search engines. By doing this, you lose the second click from the visitor.

3. Internal Links: This serves to be the most effective way of reducing a blog's bounce rate. When you provide links which are relevant to the content, within your blog, it is obvious that the user makes a click on it and thereby, he keeps hopping around your blog. In fact, you end up boosting your page views and back links too.

4. Related Posts: The last factor which I would suggest to reduce the bounce rate would be the related posts widget. I recommended every blogger to add this widget at the end of every post. It will have a tremendous effect in reducing your bounce rate and increase the page views of your site. Click here to learn more about this widget(for blogger blogs): Add Related Posts To Blogger Blogs.

As far as I know, the above four methods will definitely reduce the bounce rate. To be very frank, even I am currently working on reducing the same for my site. I So, I appreciate any ideas from your side as well. Leave them as comments below this post and I assure you that I will include them in my next series of post.

Free Premium Blogger Templates - Masunurin

Today, I present to you, yet another premium blogger template namely, "The Masunurin Blogger Template". This template is originally a Wordpress theme which was converted to blogger by "Themecraft.net". Basically, the Masunurin blogger template is a two column premium blogger template. It includes features like rounder corners, dual navigation bars, a default tweet and re-tweet icon for each blog post and a default social bookmarking system.
You may have a look at the template by checking the screen shot above. Or click on the demo link to have a live demo of the template. As I said before, the main feature of this template is the rounded corners which you may observe in the widgets. The second feature would be the navigation bars. As we have seen in previous premium blogger templates like "The Hybrid News Blogger Template" or "The Latter Blogger Template", this template also includes a navigation bar above and below the title of the blog.

Another important feature of this blog is the social bookmarking system which comes by default with the template. There are about nine social bookmarking sites which will be displayed at the top right corner to the visitors of the blog. This eliminates the need to manually install the social bookmarking sites as we do in other templates. Click here to learn about "Adding social bookmarks to blogger blogs".

The template how ever has one disadvantage, or in other words, lacks one feature which I feel is essential for a very professional site namely, the footer section. How ever, it is quite easy to add a footer to our blogs. You can click here to learn about "Adding a stylish footer to your blogger template". If you are interested in installing a footer like the one I installed, you may mail me and I will help you out!! Comments are always appreciated!! So, install the template and tell me your views!!

Add An Animated Notice Box To Blogger

Today, I would like to present you an interesting widget, "The Animated Notice Box". This widget will add a notice box such that it flashes for certain number of times say three times and then, will stay static on the web page until the user wishes to close it. It is something like an alert message which you would have seen in many websites. But, this kind of alert message can be used to increase the subscribers for your blog. If you still haven't got an idea about what I am explaining here, then just look at the screen shot below.
animated-notice-boxI hope you got an idea about the widget now. If not just visit this blog "My Test Blog" to view the demo of this widget. I will initially explain you how to install this widget in your blog with a general message as shown in the screen shot above. Later, I will provide you the code which I installed in "My Test Blog" that displays a message to the visitor asking him/her to subscribe to the blog. Let us get to our work now.

1. Go to "Design->Edit HTML. Make a backup of your template before modifying the HTML by clicking on the "Download full template" link at the top of the page.
2. Search for the following line in your template. Use "CTRL+F" to fasten your search.
]]></b:skin>
3.Add the following piece of code just below the line mentioned in step 2.
<style>
#info{
border: 1px solid;
margin: 10px 0px;
padding:15px 10px 15px 50px;
background-repeat: no-repeat;
background-position: 10px center;
position:relative;
color: #00529B;
background-color: #BDE5F8;
background-image: url('http://i46.tinypic.com/jzf8tk.jpg');
}
</style>
<script src='http://code.jquery.com/jquery-1.2.3.min.js' type='text/javascript'>
</script>
<script type='text/javascript'>
$(document).ready(function(){
$(".close").click(function(){
$("#info").animate({left:"+=10px"}).animate({left:"-5000px"});
});
$("#info").fadeOut(800).fadeIn(800).fadeOut(400).fadeIn(400)
.fadeOut(400).fadeIn(400);
});
</script>
4. Save your template. Next, you need to add the "div" section of the code any where in between the body tags of your template. The simplest way to add this code is to use the "HTML/Javascript" plug-in in blogger.
5. To do so, just navigate as follows: Design->Page Elements. Now, click on "Add a Gadget" and select "HTML/Javascript". Paste the following piece of code and hit the Save button. Leave the title section of the widget empty.
<div id="info">
<a class="close" href="#close" style="float: right;"><img border="0" src="http://i48.tinypic.com/3502jif.jpg" /></a>
This Is Your Message .You can change it to Your need. Click on close button on right to exit this box</div>
6. You may drag the widget any where you want. Once you finalize the place, click on save again and view your blog with the "Animated Notice Box" installed.

As I said earlier, you may download this text document "CODE I USED", which consists of the code I used in "My Test Blog"(Demo which you viewed). You may use the code in document for your blogs too. But, please do change the links and the title of your blog in the code (self-explanatory). Else, you will help me increase my subscribers count by displaying the box in your template:)
[netinsert=0.0.1.11.14.1]