How To Add Digg Button To Blogger Posts?

I have recently added a tweet me button(Add Tweet/Retweet Button To Your Blog) with counter on the top right corner of my blog posts. Although, the social bookmarks are already available at the end of each post, I have installed the same on top of each blog post just to increase the visibility of them. The buttons must be readily available for the visitor to bookmark rather than scrolling to the end of post, searching them and then bookmarking it. More feasible the buttons are, more the probability of getting your posts spread over the net. Simply, means more visitors to your blog!!!


This post deals with adding a digg button to blogger posts. Before we install the digg button on our blogs, we must know, what is digg??? Wiki defines it as, "Digg is social news website". Perfectly right!! But, I would say it is a user driven social news website. So, what does digg do to my blog? Very Simple!! Nothing but, drives more traffic to your blog!! That is what all bloggers want!! So, lets straight away get to our work by adding this button on our blogger/blogspot blogs. Before we start off, just have a look at the screen shot below for a preview of the final output.
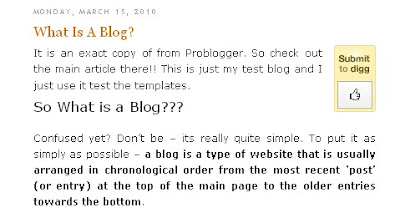
Follow the steps carefully!! Before trying this widget, please make sure that you have a back up of your template so that, if anything goes wrong, you can always upload the earlier version of your template!! To make a back up of your template, just navigate to Design->Edit HTML and click on the download full template. Once you make a back up, you can start off with following steps.

1. Navigate to Design->Edit HTML from your blogger dashboard. Now, click on the Expand Widget Templates, that is ensure that there is a tick mark.
2. Search for the following code.
<data:post.body/>
3. Now, copy the following piece of code and paste it just below the line mention in step 2.
<b:if cond='data:blog.pageType == "item"'>
<div style='float:right; margin-left:14px;'>
<script type='text/javascript'>
digg_url="<data:post.url/>";
</script>
<script src='http://digg.com/tools/diggthis.js' type='text/javascript'/>
</div>
</b:if>
4. Once, you paste the above code. Save your template. That is it!! Very Simple!! Isn't' it??

(Note: If you want the digg button to appear at the top left corner, then just interchange the words right and left in the code mentioned in step 3. Moreover, if you have enabled the post pages on your blog, you will not be able to see the buttons on the homepage. So, visit the post pages to have a look at the final output!!!)

You may place the code mentioned in step 3 in different places in your template area. Below the post section, next to the post titles and so on. If you need help regarding the installation at any specific part of your template apart from the usual place explained in this post, then you may contact me via mail or just leave your comments below and I would be happy to help you!!! Always, feel free to share your thoughts via comments:)

Free Premium Blogger Templates - Country Press

Hi friends!! I present to you yet another premium blogger template namely, "The Country Press Blogger Template". I found this template when I searched for the keyword "premium blogger templates". I felt this template looks more attractive and professional when compared to other templates of the same category. This template was initially designed for Wordpress which was converted to blogger by "Lasantha Bandara - Premium Blogger Templates". Before I start my review, check out the screen shot of the template below or click on the link to have a live demo of the template.

(Note: To download the same template without the sliding featured content, please click here : Download Country Press Blogger Template Without The Slider For Free.)
Country Press is basically a two column blogger template with a left sided sidebar rather than usual right sided sidebars. As we have seen in our previous series of posts on free premium blogger templates like "The Masunurin Blogger Template" or "The Grante Blogger Template" or "The Mimoza Blogger Template", this template also comes with ready to use social bookmarking buttons. The template attracts a lot of visitors at its first sight because of its wonderful color combination(Black and Saffron with White background for posts).

The main feature of this template would be the sliding featured content. How ever, this template has two versions. One with the sliding feature widget installed while the other without it. If you wish to add this widget(Sliding Featured Content) to your blog, then visit this link for step by step instructions: Add A Sliding Featured Content To Blogger. As found in many of the premium blogger templates, this template also provides two navigation bars and a space in the header for displaying 468x60 banner ads. Above all, this template is SEO friendly and comes with the page navigation widget installed for blogger.

How ever, this template lacks a footer section, it could be either a three column or a four column footer. To add this to your blog or to this template, just visit the following link: "Add Three Column Footer To Your Blog". Overall, a very good template to install especially for the newbies. Let me know if you liked this template or not. Feel free to leave your opinions via comments!!!

How To Speed Up Your Blogger/Blogspot Blog?

Speed+Up+Your+Blogger+BlogBasically, the speed with which your blog loads is inversely proportional to the time it takes to load. I have explained this post in terms of reducing the load time. I found an article which mentioned that even the site/blog load time contributes significantly to the Google PR. So, how do I find out whether my site load time is quick or slow. If you need an answer to this question, then visit the following link "Website Optimization Speed Report" and enter your URL.

Scroll to the end of the report page and you will notice various sections say TOTAL_HTML, TOTAL_OBJECT and so on. Each section will be highlighted either in red or green or yellow. So, what do they indicate. The report will clearly explain the color and its significance. How ever, I would like to briefly say that, it indicates the areas where you need to concentrate so as to improve the speed of loading your website. Red indicates immediate attention while yellow indicates moderate attention and green signifies an optimal performance.

I suggest you to read each and every line of that report before you proceed with this post. The report will clearly specify what scripts or images can be compressed and how much bytes could be saved by doing so. Once you have analyzed the above report, it is time to take few steps to reduce the load time. Although, there are various methods through which the load time can be reduced, I restrict myself to the most effective methods in this post. Now, let's move on to the methods!!!


1. SIMPLY THE CSS SECTION:
This method involves the compression of the CSS section of your blogger template. To do this, just visit the following link "Free Web Based CSS Compressor" and paste the CSS part of your blogger template. Once you paste the code, hit the compress button and you will find the reduced version of the CSS code. Now, replace this code instead of the CSS part of your template and save it. Ensure that, there is no problem after replacing the code by having a preview of your blog.

(Note: Before trying this step, please make a back up of your template. More over, the CSS part of your template is the code which lies between the <b:skin> and </b:skin>code.)
2. POSTS ON HOMEPAGE: The earlier versions of blogger/blogspot blogs did not include the "Read More" hack and people displayed the entire post on the blogs. How ever, this trend has reduced in the new version of blogger to some extent. Still, there are blogs where in , the home page includes so many number of posts that it becomes completely annoying for the visitor who visits the blog. Apart from losing a visitor, you lose the impressions and the bounce rate of your blog also increases. (To know more about Bounce Rate, visit the following link "How To Reduce The Bounce Rate Of Your Blog?"). So, reduce the number of posts on your home page. To do so, navigate to Settings->Formatting from dashboard and enter 4 or 5 for your blog with the "Read More" hack installed in your blog.

3. IMAGES OF YOUR BLOG:
The images displayed in your blog play a very vital role in your site load time. The images when hosted at different sites say "Imageshack, Photobucket, etc.." contribute a significant load time. This is due to the diversity of your images, that is, your images have to be fetched from different servers. To avoid this, you may use a single server to host your images. Say use only Photobucket to host all your images. Thereby, you fetch multiple images from only one server and it reduces the load time drastically. Moreover, you may compress the images which you host, thereby the images will load faster than what it did, before compression.

4. AVOID SCRIPTS:
The scripts that are included in your blog template also plays a vital role in the loading time of your website. Try to remove the scripts which you feel are unwanted. Apart from the scripts, remove the widgets which are unnecessary from your blog too. So, how do I decide a widget is important or not? Just ask the following questions to your self and you will have a conclusion. Firstly, Does the widget offer some value to your readers? Secondly, Does the widget match with your template, that is, provides an overall professional look? And lastly, Do you receive complains from your blog readers about the widget(say it disturbs them from reading the post)??? If you end up answering "No" to the first two questions or "Yes" to the last question, then I recommend you to remove that widget now!!

To be very frank, I know that my very own blog say, "
Everything About Blogging | Free Premium Blogger Templates" is not a perfect example for an optimal blog load time. I am currently working on this area to reduce the load time of my own blog. As I find out more effective methods, this post will have another series. However, please feel free to share your ideas of reducing the blog load time too via comments.

Free Premium Blogger Templates - Grante

As I said in my previous post on Free Premium Blogger Templates, I have become more specific in choosing the blogger templates. But, with respect to this template namely, "Grante Blogger Template", I never had a second thought say whether to post it or not. This template is basically a two column template which was originally designed for Word Press. It was converted to blogger by "themecraft.net". You may have a look at the template by checking the screen shot below or click on the demo link to have a live demo of the template.
So, I would like to highlight few important features of this template. To start off, I would recommend this template to all the newbies who think of changing their template from the default blogger template because I feel this template gives a very good impression at its first look. Moving on to its features, it has got ready to use social bookmarking buttons at the right sidebar.

The template also provides an attractive RSS feed and twitter icon at the top of the blog, next to the search bar. This template provides only one navigation bar which is located below the title/header. Also, the "Read More" hack can be enabled for this template with ease. The only disadvantage with this template would be the footer section. I find this section missing in many of the blogger templates. How ever, we add one if you know a little about CSS and HTML coding. If not, just visit this link (Add A Stylish Footer To Your Blog) and you can add a footer in seconds.

Overall, I would recommend this template all the newbies and even the pro's to some extent. The template is feasible for changes in text type, font color, size and so on. These customizations would be little difficult for the newbies. However, the pro's would master this and make this template, the way they want. Hope you enjoyed this template and the upcoming series of "Free Premium Blogger Templates".

Free Premium Blogger Templates - Mimoza

For the past few weeks, I am working on the keyword "Free Premium Blogger Templates". So, you will find every template that is posted here with the heading as "Free Premium Blogger Templates" followed by the title of the template. It does not mean that I post some non sense under this category. I just want to convey my message that I have become more specific in choosing the templates which I post here. Today, I present to you one such specifically chosen premium blogger template namely, "The Mimoza Blogger Template".
Before I explain the features of this template, you may preview this template by having a look at the screen shot above or just click on the demo link to check out the live demo of this template. To start off, Mimoza Blogger Template is a two column blogger template. It includes features like the sliding featured content(click here to install featured content on your blogger template), default ad blocks, social bookmarking icons and so on...

I feel the two important features that make this template stand unique would be the sliding featured content widget and the social bookmarking icons. The color combination in this template is excellent. More over, the side bars, the post area and the the rest of the template have straight bends rather than curved corners which makes it more elegant and adds a professional touch to the blog. The template also provides two navigation menus, one above the header and the other below it, for better navigation.

The template, however, carries one disadvantage with it. As we saw in the Masunurin Blogger Template, this template also lacks a three/four column footer. How ever, you may add a three column footer to the template if you know little HTML coding and CSS for styling. If not, contact me and I will help you do the same. Just try installing this template and I hope you enjoy this template and the upcoming series of "Free Premium Blogger Templates".

Add "About the Author" Box Below Every Blogger Post

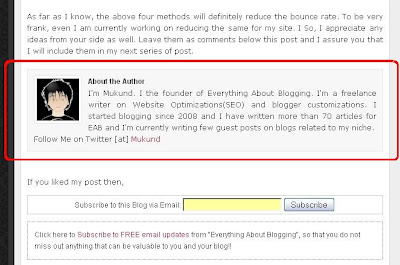
Hi friends!! I found a lot of Wordpress blogs that include an "About the Author " box/widget below every blog post. So, I thought why not provide the same for the blogger/blogspot blogs. If you had closely watched my blog posts for the past few days, you will find the "About the Author" box/widget installed below every blog post. This new hack will definitely helpful all those bloggers who have multiple authors for their blogspot blogs. If you still have a small confusion about the widget, then have a look at this screen shot below.
about-the-author-box-for-bloggerI hope you are clear about the widget now. If you like to install this widget on your blog, then please follow the following steps.
1. Go to "Design->Edit HTML. Make a backup of your template before modifying the HTML by clicking on the "Download full template" link at the top of the page.
2. Search for the following line in your template. Use "CTRL+F" to fasten your search.
]]></b:skin>
3. Add the following piece of code just above the line mentioned in step 2.
.author-box {
background: #F7F7F7;
margin: 20px 0 40px 0;
padding: 10px;
border: 1px solid #E6E6E6;
overflow: auto;
}
.author-box p {
margin: 0;
padding: 0;
}
.author-box img {
background: #FFFFFF;
float: left;
margin: 0 10px 0 0;
padding: 4px;
border: 1px solid #E6E6E6;
}
4. Save your template and check if it is error free. Now, expand your blogger template and search for the following piece of code in your blog template.
<div class='post-footer-line post-footer-line-1'/>
5. Download the following text document - About the Author Widget For Blogger. Open the text document and copy the entire code in it. Now, paste the code below the line mentioned in step 4.
(Note: Please write about yourself instead of the following text mentioned in the document, "Write About Yourself/Fellow Blogger Here!!!". Also, add your twitter name instead of the following text "YOURUSERNAME".)
6. Save your template. The code will automatically appear only in the post pages and will not be visible in the home page. Just go check out your individual post pages and you will find the widget installed.

I hope you enjoyed this post!! For any help, please feel free to leave your comments here!! I will sort out any of the issue with respect to this hack. Also, try spreading this post to your friends if you feel it is worth spreading:)
[netinsert=0.0.1.11.14.1]