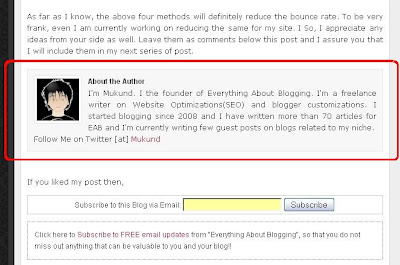
Hi friends!! I found a lot of Wordpress blogs that include an "About the Author " box/widget below every blog post. So, I thought why not provide the same for the blogger/blogspot blogs. If you had closely watched my blog posts for the past few days, you will find the "About the Author" box/widget installed below every blog post. This new hack will definitely helpful all those bloggers who have multiple authors for their blogspot blogs. If you still have a small confusion about the widget, then have a look at this screen shot below.
 I hope you are clear about the widget now. If you like to install this widget on your blog, then please follow the following steps.
1. Go to "Design->Edit HTML. Make a backup of your template before modifying the HTML by clicking on the "Download full template" link at the top of the page.
2. Search for the following line in your template. Use "CTRL+F" to fasten your search.
(Note: Please write about yourself instead of the following text mentioned in the document, "Write About Yourself/Fellow Blogger Here!!!". Also, add your twitter name instead of the following text "YOURUSERNAME".)
6. Save your template. The code will automatically appear only in the post pages and will not be visible in the home page. Just go check out your individual post pages and you will find the widget installed.
I hope you enjoyed this post!! For any help, please feel free to leave your comments here!! I will sort out any of the issue with respect to this hack. Also, try spreading this post to your friends if you feel it is worth spreading:)
 I hope you are clear about the widget now. If you like to install this widget on your blog, then please follow the following steps.
1. Go to "Design->Edit HTML. Make a backup of your template before modifying the HTML by clicking on the "Download full template" link at the top of the page.
2. Search for the following line in your template. Use "CTRL+F" to fasten your search.
]]></b:skin>
3. Add the following piece of code just above the line mentioned in step 2..author-box {
background: #F7F7F7;
margin: 20px 0 40px 0;
padding: 10px;
border: 1px solid #E6E6E6;
overflow: auto;
}
.author-box p {
margin: 0;
padding: 0;
}
.author-box img {
background: #FFFFFF;
float: left;
margin: 0 10px 0 0;
padding: 4px;
border: 1px solid #E6E6E6;
}
4. Save your template and check if it is error free. Now, expand your blogger template and search for the following piece of code in your blog template.background: #F7F7F7;
margin: 20px 0 40px 0;
padding: 10px;
border: 1px solid #E6E6E6;
overflow: auto;
}
.author-box p {
margin: 0;
padding: 0;
}
.author-box img {
background: #FFFFFF;
float: left;
margin: 0 10px 0 0;
padding: 4px;
border: 1px solid #E6E6E6;
}
<div class='post-footer-line post-footer-line-1'/>
5. Download the following text document - About the Author Widget For Blogger. Open the text document and copy the entire code in it. Now, paste the code below the line mentioned in step 4.(Note: Please write about yourself instead of the following text mentioned in the document, "Write About Yourself/Fellow Blogger Here!!!". Also, add your twitter name instead of the following text "YOURUSERNAME".)
6. Save your template. The code will automatically appear only in the post pages and will not be visible in the home page. Just go check out your individual post pages and you will find the widget installed.
I hope you enjoyed this post!! For any help, please feel free to leave your comments here!! I will sort out any of the issue with respect to this hack. Also, try spreading this post to your friends if you feel it is worth spreading:)


