How to increase the page rank of my blog?

Few days before, I had a chat with my fellow blogger and he asked me, "How to increase the page rank of my blog?" I knew this question will definitely be running in your mind and every other young bloggers. Is it possible to increase my PR?? The answer to the question is "Yes, it is possible to increase the PR through routine work and updates, but cannot have an overnight increase." Now, what do I mean by routine work and updates? The answer lies in this post. Have a glance and you will understand.
about-google-pagerankBasically, page rank of your site depends upon your site's back links. When a blog or website with higher page rank than yours link to your site, I am sure in the next PR update you will find an increase in your page rank. Thus, it is very important to get your site linked to sites that possess higher page rank than your site. Some of the other techniques that you need to adopt for increasing your page rank are discussed below.

1. PROPER SEARCH ENGINE OPTIMIZATION:
The initial step to increase your blog page rank would be to set your blog as per the search engines want. I have already discussed about this in detail in my previous blogger posts. Check out the post by clicking on the link here : How to improve your Google PageRank?

2. PROPER BLOG COMMENTING:
This method is most effective and you play a significant role in it. You have to comment on blogs that allow "Do Follow". If you comment on "No Follow" blogs, it serves for no use. It is important to comment on blogs that have higher page rank. I recommend Comment Kahuna, which I started using few days before and it pretty easy to comment and find blogs related to our niche.

3.DIRECTORY SUBMISSION:
The next effective method of improving your page rank is to submit your blog to all the directories that are available. Never invest any amount in submissions, that is, do not pay for any services. I recommend you to personally submit your site to all the free directories that are available. Get the free list of web directories here : Free Directory List.

4.MAKE INTERNAL LINKS:
This is one of the most simple techniques that one can adopt to increase his/her page rank. Just provide a link from one post to another. You may check this post, for example, I linked my previous post about page rank in the first point. This will definitely increase your page rank. More over, it increases the page views for your site.

I hope these tips help you increase your page rank. If you got some other tip, feel free to leave your comments.

Add a Stylish Three Column Footer in Blogger

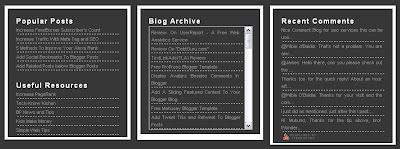
It is pretty common that you might have seen all the professional blogger templates would possess a three column footer where in, they add details about their site or an about me widget and lots more. I recommend you to add this feature in your blog to make it more professional. You may scroll down the page to have a look at the bottom of the page to have a look at this widget which contains Popular Posts, Useful Resources, Blog Archive and Recent Comments. Hope, you got an idea about what a three column footer is.
Three-Column-FooterTo add this stylish three column footer to your blog, just follow these simple steps. As we always ensure safety, the first step would be to back up your template. To do this, simply navigate to "Design->Edit HTML and make a backup of your template clicking on the "Download full template" link at the top of the page. Once the back up is over, follow these simple steps.

1. Search for the following text in your blogger template. To fasten your search, use "CTRL+F".
]]></b:skin>
2. Download the following text document : Three Column Footer One. Just paste the code in the document above the line mentioned in step 2.
3. Search your template for the following text.
</body>
4. Paste the following piece of code above it.
<div id='footer-wrapper'>
<div id='lower-wrapper'>
<div id='lowerbar-wrapper'>
<b:section class='lowerbar' id='lowerbar1' preferred='yes'>
</b:section>
</div>
<div id='lowerbar-wrapper'>
<b:section class='lowerbar' id='lowerbar2' preferred='yes'>
</b:section>
</div>
<div id='lowerbar-wrapper'>
<b:section class='lowerbar' id='lowerbar3' preferred='yes'>
</b:section>
</div>
<div style='clear: both;'/>
</div> </div>
(Note: You may paste the above code in the place where you want the footer to appear. It is ideal to place this section before the credits section in your blog.)
5. Now, save your template and your ready with the footer section. Add any widget you want. Feel free to comment or contact me via Email for any assistance that you need to install this feature. I would be happy to help you!! See you soon in my next post!!!

Solving/Fixing "Another blog is hosted at this address" Error

 I recently shifted my blog, Everything About Blogging, from the default blogspot domain to a custom domain (www.newbloggingtipz.com). I had a lot of confusion whether to shift my blog to WP or just buy a domain & stick to blogger. I consulted my friend & he simply said, "Be it blogger or wordpress, if you have good content, you can reach great heights". So, I chose to stick with blogger but preferred a custom domain. UPDATE : New article can related to this topic can be found here - SOLUTION

Fine. Let's get to our work. After all the initial setup with CNAME and A records, when you try to enter the URL through blogger for your custom domain, that is, when you transfer your blogspot domain to custom domain, you will encounter the error saying "Another blog is hosted at this address". I know how annoying it is to see that kind of an error. Don't panic. It is very simple to solve this problem. Just few minutes of work and your error is fixed!!

Follow these simple steps.
1. Login to your Google Apps account.
2. From the dashboard, hover to Service Settings and then select Sites under the menu.
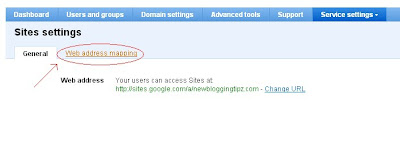
3. Choose the tab Web address mapping instead of General as shown below.web-mapping-google-apps4. Now, you will be able to see www address in that list. Select and Delete it. Just proceed with the warnings and confirmations.
5. Once you finish this, move on to your blogger dashboard. Navigate to SettingsPublishingSwitch To Custom Domain - Advanced Settings from the dashboard. Now, enter your custom domain URL with "www" before the domain name. (Eg: www.newbloggingtipz.com)
6. Now, save your settings and the error is fixed. Still if you face problems, then use this form called "Magical Custom Domain Form" and let the blogger help forum fix it.
[netinsert=0.0.1.11.14.1]