4 Simple Tips To Jumpstart Your Writing

jumpstart-writing
Writing a blog entry is not the same as writing an academic paper. It should not be too long or excessively detailed. It should be informative and something people would actually want to read. This being said let us go through these simple tips can get you over that dry spell and jumpstart your way to a new blog entry.

1. READ SOMETHING TO GET YOU GOING
Before pounding those keyboards, lead your mind into that “writing zone” by reading. A simple poem or short story can do the trick. You can even try an audio book. Try doing this and you will notice that writing comes naturally. You can just breeze through your way to writing. Just like when running, you need some warming up before everything becomes smooth. The mind needs some warming up too so it does not cramp in the middle of writing.

Integrating Google Analytics with WordPress

WordPress.com and WordPress.org are from the same parent company, but there are some major differences separating the two. Put simply, WordPress.org provides more freedom while WordPress.com provides more support. WordPress.com is hosted and provides you with a dedicated server so the traffic managing, spam blocking, security and even networking are taken care of.

It's a fantastic option if you aren’t that PHP/HTML savvy or if the traffic on your site will be fluctuating. (WordPress.com’s support keeps it from crashing due to an influx.) However, because you cannot manipulate a lot of things on the back end of your site the opportunity for radical customization is lost.

WordPress.org allows you to upload themes or templates, so you’re not starting with a completely blank space. But you can customize your code: a blank canvas for someone technically-minded. WordPress.org is not hosted. So while it's a free service, you would have to independently find hosting and pay for it. WordPress.org can also be less secure as you are responsible for combating spam.

Both .com and .org are social. With WordPress.com you can find other blog owners with similar ideas and WordPress.org provides community support forums and mailing lists. These tools are important for generating more traffic to your blog – something everyone wants.

Once the new traffic is gained it is important that you monitor and record it. The free plugin Google Analytics for WordPress efficiently provides that support. You can manipulate just about all of the data that Google analytics gives you in order to analyze how users are interacting with your site. Installation is easy and the program is straightforward. Within your WordPress site delete any existing gapp or google-analytics-for-WordPress folder from the/wp-content/plugins/ directory. Next users should upload the google-analytics-for-WordPress folder to the /wp-content/plugins/directory and activate the plugin through the "Plugins" menu in WordPress. Finally, navigate to the "options" panel under the "Settings" menu and add your Analytics account number. Specify the settings you prefer. Enjoy.

Google Analytics not only collects all of your site traffic data but also compiles it. Graphs, tables and diagrams are all relevant and readable. You can select filters as specific as “ignore any user level and up,” which allows you only to look at editor activity. Or you can track meta data on pages like “publication year.” Aside from result-filtering, Google Analytics also provides AdSense integration, Ad Manager integration, Contact Form integration, Mediacaster integration, Newsletter Manager integration, 404 error and outbound link tracking, Search tracking, Domain-wide tracking and Custom event tracking.

IntergratingWP2
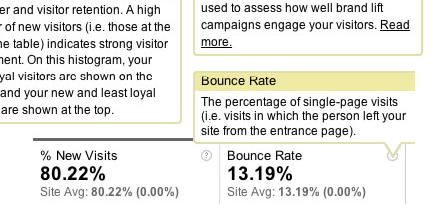
 The data it reports is also well-labeled, so users new to Analytics can understand what the information means. Here, the blog owner can see that %13.19 of her/his traffic leaves after the first page. He/she could figure out where that 13.19% is coming from and better cater to them.

But once you get traffic data, how do use it? Well, the more you know about how people interact with the site the better. So keep poking around. Manipulate the data. View specifications like "unique page views" and "time on page." Monitor traffic before you put up a new post. Once you publish something new tweet the link and see how many people bite. You can wait a few days and then Facebook it to gauge effects. Reddit, Google + and Digg are powerful tools, too. See which social media platform grabs you the most views. Paying attention to when you post something can help you manipulate the amount of sharing that happens, too. For example, a business news article may get more views in the morning while a gaming article can still gain a lot of traffic at 2AM. Once you find patterns in your posts, optimize your timing.

IntergratingWP1

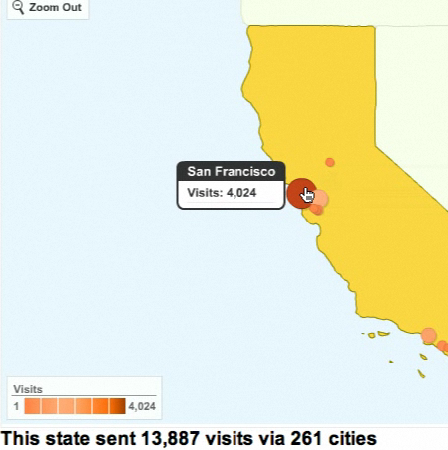
Maps, charts and graphs help to determine where traffic is coming from and, therefore, how to target it. Here, the blog owner sees that most of her/his traffic comes from the San Francisco area.

Once you've figured out the best time and place to link your blog make your next few posts cover different topics. Doing this will reveal your readership. Do the people visiting your blog love your new scone recipe (many visits, all spending time on the page)? Do they completely skip the article about your son? Being able to see where your traffic comes from is also important. Knowing that many of your views came from your link on a sewing blog means that you should cater to them with crafty content. Consider finding other sewing blogs for which to write. Understanding that most of your traffic lives in the San Francisco area, however, would hint that focusing on a Frisco event could bring more traffic.

Managing and understanding the traffic that visits your site is crucial to recognizing your audience and seeing how to best engage them in the future, both to maintain interest and encourage more traffic. By catering to your traffic you may have a completely different blog on your hands than the one you started. This is fine; many blogs go through transitions as trends circulate the Internet. Google Analytics’ precise record-keeping is beneficial to anyone with a WordPress.org site who wants to increase effectiveness and reach.

Hostgator & GoDaddy Black Friday 2011 Offer

HOSTGATOR BLACK FRIDAY 2011 OFFER
Hi! I just received an email from Hostgator Affiliate team about the Black Friday 2011 offer wherein they are planning to offer a flat 50% OFF on the final bill that you are about to pay. In other words, you get a flat 50% OFF on any plan - be it a Shared hosting or Hostgator dedicated hosting or Hostgator VPS hosting. So, what you waiting for? Just grab the one that best suits you!
Hostgator
I personally recommend a Baby plan for the newbies which would cost you $59.7/year using the Black Friday offer. You don't have to enter any coupon codes! Unlike last year wherein the offer existed for an hour, this year, they have extended the timings for a period of 24 hours. The offer starts in India at 11.30AM from November 25th to November 26th (11.30AM). So, hit this link and grab the hosting plan of your choice - Hostgator Black Friday 2011 Offer.

GODADDY BLACK FRIDAY 2011 OFFER
Well, if you are a newbie and passionate about making money online with your blog, then I strongly recommend you to buy a custom domain because there lots of advantages having a custom domain. I'm sure many users do not have funds to host their blog. However, I'm sure they can afford to buy a custom domain. The Black Friday 2011 offer from GoDaddy is a gold mine for all the newbies to grab. Simply because, you can buy 5 .COM custom domain for $5.00 which means you get each domain at just $1.00. 
$5 .COM Black Friday Sale!
Just hit the above banner and proceed to the bill desk to place your order. Alternate method to avail the offer would be to visit the following link - GoDaddy Black Friday 2011 Offer. Search for the domain name of your choice in the column that says "Type your domain search". Proceed to the bill desk. Now, type in the Coupon/Discount Code as BlackOne. That's it!

Apply the coupon code and you will be billed for $1.00/year! The offer runs until 10K domain names are sold! So, make sure you avail one before the offer ends! Do let us know if the coupon code worked for you via comments:)

SEOCLERKS – Affordable Link Building Service

I received quite a lot of emails wherein people asked me few simple methods to build their links. Although I have written a lot about the same issue on my previous articles about improving page rank, I wanted to make a quick post about a service which I encountered recently -  SEOCLERKS.
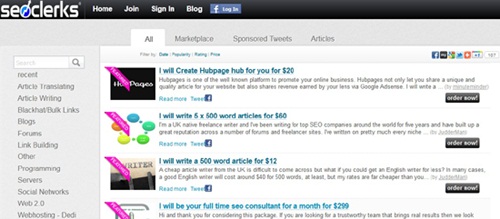
seoclerks
Well, seoclerks is a simple and affordable SEO service that every webmaster might opt for. Why because, it’s run by the people for the people. In other words, SEO experts post their jobs and if you happen to find what you want, you can place your order against them. It’s similar to Fiverr wherein you order the gig that most interests you. Simple!

I just had a glance at their site/gigs listed and I found some of the following listed – articles that are pretty descent by standards about SEO (not just about SEO and marketing, you can see a hell lot of topics there), eBooks that fetch you a list of high PR dofollow blogs, people who submit your blogs to high PR dofollow blogs/links and lots more... 

Various topics/categories that interested me were the following – Article writing, blackhat links, link building, programming, social networking, webhosting. I just leave the rest to you – go, check out the site yourself to experience what they actually offer - seoclerks!

You get the option to request a gig - may be a brief profile intro about yourself to publicize the same in a social networking site or an article about rocket science. So, go ahead and post what you want – you’re not gonna lose a penny until he/she completes your job. 

To summarize, I guess it is an ideal service which one may opt to buy links at reasonable price. Though I don’t recommend buying links personally, if you wish to realize faster effects of PR, then it is recommended that you buy high PR links.

How to Make Money Recreating Expired Domains?

Every year, thousands of domain names are not renewed for some reason. Their owners either forget (or) no longer interested in running the website. Some of these domains might have generated huge amounts of traffic. This means that by creating a site of your own, you can replicate the success of the expired domain.

The first step is to identify expired domains which were attracting a significant amount of traffic. By researching online, you will find several sites where you can bid for expired domain names. Once you get a domain name, you can begin with the process of creating a website which closely resembles the one that existed preciously. When you visit these domain sites, you will be able to see a list of domains that have already expired, as well as those that are about to expire. At a glance, you will be able to see if there is anything that would interest you.

While replicating the previously existing site, make sure you don’t create an exact copy. You just need to take note of the features that made the site successful, and then building something original which is much better. When you are rebuilding an expired domain, you already have a head start, knowing how well the domain has performed in the past. By researching the topic thoroughly and doing some keyword research, you can start on a high note and begin attracting traffic from day one.

You can monetize the site by selling appropriate items from it. By joining Commission Junction, ClickBank or any other affiliate program, you can sell anything from DVDs and vacation packages to games, computer accessories and toys. You can also join the Google AdSense program, where you can make an income by getting clicks on ads displayed in your site. Contextual advertising has been a major source of income for my blog which promotes register.com discounts and webhostingpad coupons. 

To keep your site popular, make sure you update it regularly. Add new articles now and then. Monitor the performance of your adverts and products to ensure you earn the best profits possible. If you want to build a profitable website, you will do it much faster by going for an expired domain name instead of building a new one from scratch.

5 Simple Tips to Improve Your Blog's Readability

There might be hundreds of blogging guides and tutorials available on the internet, but no one can ever spoon feed the techniques of blogging. Blogging is not the complex way of writing, but creativity is the very soul of the art of blogging. Your blog is a window of your imaginations and the perceptions about the subject. You can mix up your writing style within the boundaries of your perception, but never do something, which leaves a bad impression in any way.

If you are done with a domain name and web hosting, then start writing. A blog should contain great content. It must provide a valid reason, as why a reader should spent time on reading it? Mentioned below are few tips that you might consider to build a better blog.

KEEP YOUR MINDS OPEN
Never ever craft your blog a niche specific site. Ultimately, this will allow you to make choice regarding subjects and intriguing issues around you. Similarly, if some idea has already been discussed on some other site, then use a different approach. Give a new angle to the same old issue and create something new on your own.

Let the words play for you and give a new dimension to the happenings around you. It’s more than a sin to provide plagiarized content on your blog. A reader can’t be fooled by some copied material. So, always provide firsthand and authentic information. Take it seriously and make it sensible, useful and readable.

STAND OUT IN THE CROWD
Your voice should be heard in the crowd of countless blogs and other information portals. There are thousands of established blogs around you, which will never let you go in the limelight. So, what else you can do to promote your blog and provide something, which they can’t? The world is too big and there are millions of topics to cover.

Compete with the other well-established blogs, which are providing a bulk of information to their readers. Believe in yourself and produce something, which can make you famous enough like a celebrity online. Let the competitors see your real talent and skills in your informative blogs.

“CONTENT IS KING”
 Yes, content is the king of blogging, but providing unique content is not a rocket science. You can create your own piece of creative content if you can do good research. Research is the base of writing a good content. After selecting a topic, do some relevant research and produce good quality content out of it. If you have a strong grip over the topic you have started writing on, then producing good content wouldn’t be so hard.

Quality content will also help you build good ranking of your blog in SEO perspective. So, follow the rule and make it happen. It’s better to write on your own, while inserting the most important facts and figures about the subject.

MAKE IT WORTH READING
Establish your blog with good words and phrases. It’s good if you know your subject and you have done some intense research over it. Like an idea and comprehensive research, good fabrication of words and sentences is also needed here. Your content should be eye-catching and worth-reading. Keep grammatical mistakes out of your content and produce it in a way that it can attract users.

Once you learn how to play with the psyche of the readers, you can produce great quality content. Don’t use such language, which doesn’t make any sense and confuse your readers. Explain everything like your reader knows nothing. Make everything well-explainable and to the point.

AVOID FILLERS AND STUFFING
If you’re absent-minded or don’t want to write something, then don’t give a damn, but avoid using fillers to complete the word count. Fillers and stuffing sound very bad and should be avoided permanently. Don’t confuse the readers with useless words and phrases. Just come to the point and make it clear. There is no need to create a table story if you are finished with the main subject. Stretching the main subject will make the readers lose their interest in your blog.

Loosing readers is not recommended here. You must be focused on your creative writing while feeding the blog with essential content. No doubt, there comes a point when we all use to put fillers to narrow down the gaps, but these tendencies should be limited. Or at least, use words and sentences logically to make sense.

Don’t be a short-sighted and have a deep look into your creative content. It should be logical and concise. Today, a reader demands good information in small chunks. It’s proven that reading on a screen is quite difficult than on paper. So, get him what he wants from you. Keep the long story short, which lets him skim the main information. Have you done this to your blog?

Install Adsense With Search On Blogger

adsense-search-blogger
I hardly get time to publish articles on my blog these days. Nevertheless, I found sometime today to write a quick article about integrating Adsense on your search results page for blogs run on blogger. If you aren't able to understand about what I mean, then type some text on the search bar at the top right corner of this blog and hit the "Enter" tab (look out for the Adsense Ads on top of the search results).

To install a similar search engine on your blog, just follow the instructions given below.
1. Go to the following link - Google Custom Search. Hit the tab that says "Create a Custom Search Engine" and fill the form that appears. Ensure you fill up the column that says "Sites to search:" with your blogger URL.
2. Once you fill the up form, choose the layout for your search bar. Click next and your done with creating your custom search engine. Do not copy the code that is shown to you. Rather navigate to the following link - Manage Custom Search Engine.
3. You should be able to see your custom search engine name listed under the column that says "Search Engines I've created". Hit the control panel link and you will be navigated to a page with options to customize your search bar.
control-panel
 4. Choose "Make Money" from the options listed under the left sidebar and select the option that says "I already have an Adsense Account". Fill the required details and your done. Now, your search results page will run with Adsense Ads.
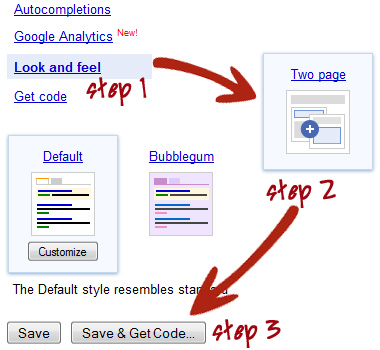
5. To get this search engine on your blog, you need to follow the rest of the steps as well. Choose "Look and feel" options from the left sidebar and select the option that says "Two page" and click the tab "Save & Get Code".
look-and-feel
 6. Just leave the page intact. Open a new window or tab in your browser. Login to your blogger dashboard and click on "Edit Posts". Now, click on the option "Edit Pages" and create a new page called "Search Results". Shift your tab to the "Edit HTML" mode from the "Compose" mode on your post editor. 
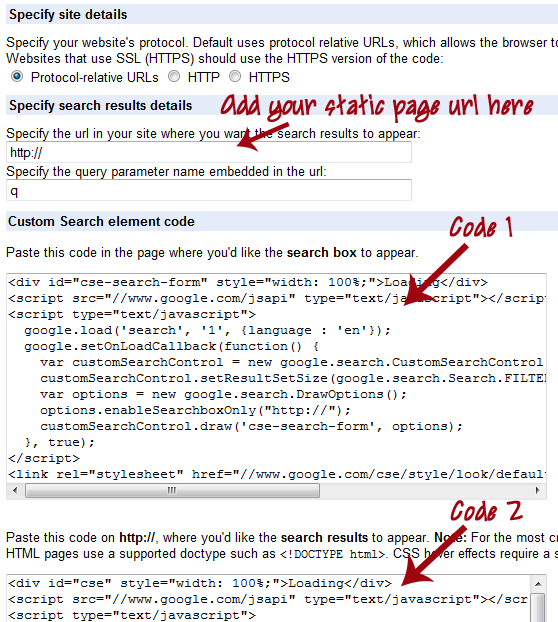
7. From the previous window/tab (the one which I said to leave intact), copy-paste the second block of code to your blogger post editor (currently operated in the Edit HTML mode). Just publish the page. Open the new page which you have created and look out for the URL of the page. It should be something similar to the one shown below.
http://www.newbloggingtipz.com/p/your-search-results.html
8. Now, copy this URL and paste it below the blank space/box (on the custom search engine page as shown in the screen shot) that asks for " Specify the url in your site where you want the search results to appear".
CSE-code-page
 9. After pasting the URL, copy the first block of code and paste it anywhere on your Blogger template - either parsing it and pasting it on your template or just adding them as a Gadget using "Page Elements" page. Both the methods will work. That's it!

You can verify your search results page now. When you type in a query on the search bar, your results shall appear on the page that your created with the Adsense Ads on top - sometimes I see them on the right. I tried to keep the article simple. If you need assistance in installing the same, then leave a comment and get it clarified! Share your opinions about the article via comments:)

Devil's Workshop Template Customization - Part 2

fixing-errors
I'm overwhelmed with the response for Devil's Workshop Blogger Template. Missed it? Then, take a look at it - DW Blogger Template. I received lot of emails appreciating my efforts to create the template. With that being said, I do receive mails about the various bugs/errors in the template. So, this article deals in solving those issues.


ISSUE WITH READ MORE HACK
Many people emailed me stating that the read more hack is not working on the template. The read more hack is installed, by default, in the template. You just need to enable it in every article you post. In other words, it's a manual read more hack which works using the "Insert jump break" option available on the blogger post editor. If you are using the very old post editor, then you need to update the same and look for the icon shown below.
jump-break-icon
Position your cursor at the end of the first paragraph in your article - not necessary the first paragraph. Hit the "Insert jump break" icon available on the post editor. Later, publish your article to see the read more hack working on your template. Remember that you need to repeat the same procedure before you publish each article to make the hack work.

ISSUE WITH GOOGLE PLUS ONE BUTTON
The second issue deals with the Google Plus One Button installed to the right of post title on homepage. The plus one button, when shared, incremented the counter for the entire blog rather than incrementing it for each article on the homepage. Quite annoying for a reader to see simultaneous increment for the entire blog when he/she tried to just plus one the article. Well, don't worry! I've fixed this issue now.

To add Google Plus One Button to individual article, or in other word, to increment the count for each article on homepage, follow the steps mentioned below.
1. Navigate to "Design>>Edit HTML" and make a backup of your template by clicking on the "Download full template" link at the top of the page. Once the back up is over, expand your template and search for the following block of code.
<div style='float:right; margin-left:8px; margin-top:-5px;'>
<fb:like action='like' colorscheme='light' expr:href='data:post.url' font='arial' layout='box_count' send='false' show_faces='false'/>
</div>
<div style='float:right; margin-left:0px; margin-top:-3px;'>
<g:plusone size='tall'/>
</div>
2. Replace the code highlighted in blue with the following piece of code.
<div style='float:right; margin-left:0px; margin-top:-3px;'>
<g:plusone expr:href='data:post.url' size='tall'/>
</div>
3. That's it! Save your template and your done!

Now, try to plus one each article individually and you'll see that they increment as they should! Let me know the other errors or bugs associated with the template. I'll try to fix each one of them. If not, post why they can not be done:) Nevertheless, I hope you enjoyed this update. Share your opinions via comments below:)

YouTube Introduces Video Edits With Cool New Features

youtube-features
YouTube has introduced new editing features this week. This allows users to edit their already uploaded videos and the videos will retain the same video IDs so that the counts and comments are not lost. All the links remain the same as well. The user has to click on the “Edit Video” button on his video’s page or the My Videos page. This feature enables the user to edit the videos in a shorter time frame.

YouTube wants that, the users be given the ability to polish their videos and the edit feature is part of that initiative. A majority of the YouTube videos are rough amateur footage and this will give the amateur enthusiasts to add a touch of professionalism to their work.

The Edit option enables the user to stabilize hand-held footage, rotate the videos and enhance the colors and contrast. There is an “I’m Feeling Lucky” feature as well that enables one click color correction. Moreover, you can easily convert your 2D videos into 3D with just a click. There are lots more features apart from those mentioned here. So, login to your You Tube account and look for the Edit option on your dashboard.

The team has worked with the Picnik (the online image editing tool) team which Google acquired last year to add artistic effects that enable the user to add filters such as black and white and cartoon effects to the videos. The user can even swap the audio and can chose from a selection of available tracks. The user has the option of trimming the video as well if it is too lengthy at the beginning or the end.

Once the editing is complete, the user can click on the save button and the processing will start. If you are not happy with the results, you can go back to the original version. There is an option to of saving multiple versions as well. But videos that have more than 1000 views or third party content, can only be saved in the new version.

Queryads Review – Another Adsense Alternative

Queryads
People say, days of Pay Per Click (PPC) ads are gone but I personally feel that, even those who say that make the maximum out of PPC ads only. In other words, it is still the best method to make money online – predominantly using Adsense or other alternatives to Adsense. So, I sat down last night to find a quality Adsense Alternative and I ended up with this website called “Queryads”.

Queryads provides publishers PPC ad block similar to Adsense to make money online. From the reviews around the web, I found that their ads are relative to a website’s content unlike other alternatives. For example, if you run a website about food, the ads are predominantly oriented to food. Well, this is the most important criteria that a publisher should look out for.

Secondly, as a publisher, you should look out for the speed with which the ad blocks load and I feel it is certainly quick when compared to other alternatives. Moreover, it is compatible with Google Adsense. In fact, you can insert your Adsense ID to avoid repetition of advertisements – something that many alternatives do not care about.

You earn 70% of the revenue that you generate – the remaining 30% is absorbed by query ads as commission. The minimum payout to withdraw your earnings is $10.00 (seriously way too low) and you can maximize your earnings via affiliate sales by referring, both advertisers and publishers. You’ll earn 10% as a commission for every amount that the advertiser (the one you referred) spends on queryads or when a publisher generates income via queryads.

As an advertiser, I don’t have much expertise about the same. However, from the perspective of an observer on their site (watching the video and other stuffs), I feel you might get quality publishers to advertise your product. Moreover, you get 100 free visits initially – so, you may give them a try. You may refer to the FAQ page for further details - Queryads FAQ.

To wrap up, as a publisher, I feel this is a better alternative to Adsense - definitely not the best. Nevertheless, it's free! So, what you waiting for? Just sign up for free and try their service. Later, share your opinions via comments below.

Add 3D Text Effect Using CSS On Blogger

3d-text-effect-blogger
Inspired by the effect on David DeSandro's footer, I worked out the CSS behind his three dimensional text effect. Well, in this article, you'll be able to get a similar effect on your blogspot blog. The normal state shows the text with a black shadow and on hover, you get to see a colorful text with colorful shadow. Take a look at the live demo using the link below to better understand about the same.

3D TEXT EFFECT ON BLOGGER - LIVE DEMO

ONE-CLICK INSTALLATION TOOL FOR NEWBIES
The recent entries on my blog had the one click installation tool and I've incorporated the same in this article as well. I recommend the newbies to follow this method whereas the experts/webmasters can follow the detailed procedure. Firefox 3.0+, IE 9.0 and Opera are some of the browsers that support the one-click installation method. So, make sure your browser is one among them and hit the following button to install the 3D text effect on your blog.


DETAILED PROCEDURE FOR WEBMASTERS
1. Navigate to "Design>>Edit HTML" and make a backup of your template by clicking on the "Download full template" link at the top of the page. Once the back up is over, search for the following piece of code.
]]></b:skin>
2. Paste the code present in this text document - CSS FOR 3D TEXT EFFECT, just above/before the the line mentioned at step 1.
3. Now, paste the following codes anywhere in between the opening and closing of body tags on your template.
<div id="animationWrapper">
  <a href="EXAMPLE URL">
    <span class="span1">Sample</span>
    <span class="span2">Example</span>
    <span class="span3">Effects</span>
    <span class="span4">Blogger</span>
  </a>
</div>
Ideas: You may add this 3D effect to display your blog title or post title or show off your links at footer similar to DeSandro's blog. The choice is left to the individual.
4. That's it! Save your template.

CUSTOMIZATION COMMON TO NEWBIES AND WEBMASTERS
Replace EXAMPLE URL in the coding with the URL of your choice and correspondingly, replace the text that runs between the span tags with that of your choice. Further customizations include changing the font size, color and its type - just play around with the CSS to change these customizations. Hit me via comments if you need assistance in doing so. 

The above effect was tested to work perfectly fine on all the major browsers that includes, but not limited to, Firefox 3.0+, IE 9.0, Opera and Safari. I hope you enjoyed this tutorial. Share your opinions via comments!

Devil's Workshop Template Customization - Part 1

stay-connected-tut
I've been receiving a lot of positive reviews and feedback about the Devil's Workshop blogger template - the load time being appreciated the most. If you did not find to check out the template, then I highly recommend you to spare some time to check it out - DW Blogger Template. I've planned to share the "Stay Connected" widget code in this article.

This widget namely "Stay Connected" is a subscription box that is most essential for any blog . The widget is a slightly modified version from the original one. I've tried to add the latest networking icons like Google+ to stay updated and to better connect with the users. You may preview the same on the demo blog by hitting the following link - DW Template Live Demo (or) just take a look at screen shot posted below.
stay-connected-widget
ONE CLICK INSTALLATION
Just install the widget "Stay Connected" using the install button below, provided your browser is either one of these - Firefox 3.0+, IE 9.0 (or) Opera. I'm not sure about Chrome and Safari, because I heard that it works for few, whereas it shows an error for the rest.

THE USUAL PROCEDURE
If you are unable to install the widget using the button, then navigate to "Design >> Page Elements" page from your blogger dashboard. Choose "Add a Gadget >> HTML/JavaScript" and just paste the entire code in this text document - STAY CONNECTED WIDGET CODE, on the new window that pops up. Name the title of the widget as "Stay Connected". That's it!

COMMON CUSTOMIZATION
Once you've installed the widget on to your sidebar - be it via one click installation method or the usual procedure, make sure you customize the widget as per the instructions given below, before you save them.
  1. Replace FEEDNAME at various instances (5 instances) in the code with your feed name. The title of your FeedBurner feed serves as the feed name of your feed. So, login to your feedburner account and look for the feed title.
  2. Replace TWITTER-NAME at one instance in the code with your twitter user name.
  3. Replace FACEBOOK-URL at one instance in the code with your fan page URL on Facebook.
  4. Replace GOOGLE-PLUS-URL at one instance in the code with your Google+ Profile URL.
  5. Note: If you don't have one, then leave your email via comments asking for an invite and I'll invite you to Google+ so that you can enjoy the new social networking, just as we do.
  6. Replace HOMEPAGE-URL at two instances in the code with the home page URL of your blog.
I'll continue to post other tutorials about customizing Devil's Workshop Blogger Template in the upcoming weeks. Stay tuned to my blog so that, you don't miss out any customization.Do share your opinions about this article via comments:)

Fixing Common Template Errors On Blogger

blogger-error
I realized that I had gone too much into designing widgets, losing track of the basic stuffs which drove a lot of traffic to my blog - those articles and tutorials which helped the newbies solve their common problems. With that being said, I plan to post articles and refresh on topics that are already existing on my blog with a better view and knowledge about them in the upcoming weeks.

In this article, I plan to provide solutions for the most commonly encountered template problems on blogger. I guess webmasters shall find this article way too silly but, I'm sure this is a life saver for many newbies out there. I'll just list out the problems, as it appears on the dashboard, when you try to make a change on your blogger template. Obviously, solutions shall follow below them:)

Most commonly encountered problem on blogger - "Your template could not be parsed as it is not well-formed. Please make sure that all XML elements are closed properly." This error message is usually accompanied by another message that indicates the actual reason for this reason. Hence, you should watch out for the next statement which may be one among the following.

XML error message: The entity name must immediately follow the '&' in the entity reference.
SOLUTION: Just look out for the place where you modified the codes on your template. I'm sure you'll find the following symbol - &, somewhere in the newly inserted code. Just add amp; to the right of the symbol or in other words, suffix amp; with that symbol to fix the error.

XML error message: Open quote is expected for attribute "{1}" associated with an element type "href".
SOLUTION: The element type may be src or type or class or id or anything for that matter - not necessary that it should always be href. Well, it is pretty simple to solve this one! You just missed an a quotation mark some where in the code. Consider the example below.
<a href=http://abc.com">Example</a> should become <a href=''#">Example</a>

XML error message: The element type "img" must be terminated by the matching end-tag "</img>"
SOLUTION: This error occurs when you miss out a trailing slash ( / )that should appear before you close the img tag. This could be better explained with an example as shown below.
<a href=''source link"><img src="img link"></a> should be changed to
<a href=''source link"><img src="img link"/></a>

More than one widget was found with id: HTML1. Widget IDs should be unique.
SOLUTION: This occurs when the id name is found to the same at two instances. Just change the id name to solve this issue. For example, from id='HTML5' to id="HTML57" - a unique name that does not appear anywhere on your template.

We were unable to save your template. Please correct the error below, and submit your template again. There should be one and only one skin in the template, and we found: 2
SOLUTION: Simple! You defined two different skins on your template. Make sure you delete one and the problem should be fixed - occurs at very rare instances. But, it does happen:)

bx - xxxxxx error
SOLUTION: You'll find bx followed by some number when you try to save your template - usually occurs when you try to shift tabs between "Page Elements" and "Edit HTML". Just make sure you save your widgets at their respective positions before you shift the tabs to avoid this error. Clearing your browser cookies might help sometimes. Saving your template by manual deletion/removal of widgets using "Page Elements" section is better than using the wrench icon to delete them - avoids the errors.

Well, only few errors are mentioned in the article above. There are plenty of errors which you might have encountered. Just share them via comments - possibly with their solutions as well. If not, just post the error you encounter and I'll try to fix it up for you!

Increase or Decrease Your Font Size On Blogger Dynamically - The Text Resizing Widget

resize-fonts
I've been constantly trying to provide unique articles for blogger/blogspot blogs. With the same motto in mind, I've got yet another interesting trick today wherein you can re-size (both increase or decrease) the size of your texts dynamically. I suggest you to take a look at the live demo using the link below to better understand about the same.

DYNAMICALLY RE-SIZE THE FONTS ON BLOGGER - LIVE DEMO

I guess you understood what do I mean changing layouts dynamically.Wondering, why should I use this? Pretty simple! Your blog shall be read by people from various age groups. Few might feel it comfortable to read the articles on your existing font/text size while few may find it difficult - especially the old age group. Hence, you shall add few lines of a JavaScript to satisfy every reader on your blog, by providing him/her the ability to customize the visual appearance of your blog. Interesting... Isn't it?

FOR NEWBIES - ONE CLICK INSTALLATION
Warning: The one click installation button works only on Opera, Firefox 3.0+ and IE 9.0! So, if you are using any other browser, then please skip this method and scroll down to install the widget using the alternate method - the one explained for web masters.

Without wasting your time, let me dive into the tutorial. I've created a simple one click installation button, as shown below, by which a widget shall be added to your blog so as to change the font size dynamically. It's specially targeted to newbies and those who hate playing with codes, unlike me! 


On installing the widget, you will notice the following text - CONTENT GOES HERE, appearing on your blog. Just replace CONTENT GOES HERE with the content of your choice and your done! You should be able to make your text bigger or smaller by clicking the respective links mentioned in the widget.

Note: By opting for this method, you will be able to increase or decrease the text that lies in the widget - those lines which you replaced with CONTENT GOES HERE. In other words, the content between the div id and div.

FOR WEBMASTERS - A LITTLE COMPLEX PROCEDURE
1. Navigate to "Design>>Edit HTML" and make a backup of your template by clicking on the "Download full template" link at the top of the page. Once the back up is over,  expand your blogger template and search for the following piece of code. Use CTRL+F to speed up the search.
<div class='post-body entry-content' >
2. Just add id='wrap-content' along with the div tag mentioned at step 1, that is, next to class='post-body entry-content'. So, your final tag should be similar to the one shown below.
<div class='post-body entry-content' id='wrap-content'>
3. Save your template and move to the "Design >> Page Elements" page.
4. Choose "Add a Gadget >> HTML/JavaScript". Now, paste the following codes in the text document  - TEXT RESIZING SCRIPT, in the window that pops up (fill the content part - not the title). You may add a title to the widget or you may leave it blank - the choice is yours.
5. Well, that's it! Save your widget and your done!

Note: By following the complex procedure, the font size of your articles, be it the one on the homepage or the post page, will increase or decrease unlike the ones using the widget version. To understand the difference, try both the methods:)

The biggest advantage with this script is that, it works independently and does not require a jquery library file, unlike the other tutorials on dynamically changing layouts on blogger - Changing Backgrounds and Adaptable View. Just few lines of script will do the magic. Tested to work on all major browsers. Compatible with all the blogger templates - be it the customized ones (or) the default blogger themes.

Well, I would like to know whether you enjoyed the one click installation tool in this tutorial or not? I'll probably try to use them more often than not in the upcoming articles so that, even the newbies can enjoy the various effects posted on my blog. Anyways, share your opinions about the article via comments! We love to hear from you:)

Download Devil's Workshop Blogger Template!!!

devils-workshop-blogger
Today, I'm happy to release, yet another premium quality blogger template - "Devil's Workshop" for free. For those of you who missed the previous entries, please refer to the following link - Premium Blogger Templates. This template is used by the most popular tech community blog - "Devil's Workshop". I've converted it to a blogger template, whose live demo can be previewed using the buttons below.

I've tried to match the original template to the maximum extent possible. I do know that, there are spaces for improvement and these gaps/spaces shall soon be filled with further customizations in the upcoming weeks. So, stay tuned with the my blog - Subscribe via RSS

If you feel this template "Devil's Workshop Blogger Template" does worth few pennies, then donate them using the button on the demo link (look at the sidebar) or send them to the following PayPal ID smalwayz@gmail.com - simply, for the hard work that I put in. Your contributions, howsoever small, shall drive me to design unique blogger templates and provide them for free! So, please make one if you can:) Check out the screen shots using the buttons below.
Well, this template is equipped with enormous hacks and features. As mentioned earlier, the customization for each feature shall be explained in detail, in the upcoming weeks. Nevertheless, you can download the template and start playing around the same before we launch the customization series. 

FEATURES OF THIS TEMPLATE
Mentioned below are few features which you need to have a look at.
01. TOP NAVIGATION BAR WITH GOOGLE SEARCH.
02. HEADER WITH SPACE FOR DISPLAYING 468x60 BANNER ADS.
03. GOOGLE ADSENSE LINK UNIT TO MAXIMIZE ADSENSE REVENUE.
04. FEATURED CONTENT SLIDER (coding shall soon be posted).
05. SHARE COUNTERS NEXT TO POST TITLE ON HOMEPAGE.
06. CUSTOMIZED TEXT DISPLAY FOR COMMENTS BELOW POST TITLES.
07. READ MORE HACK INSTALLED BY DEFAULT.
08. SIMPLE FOOTER TO MATCH THE ORIGINAL THEME.
09. CUSTOMIZED SUBSCRIPTION BOX (coding shall soon be posted).
10. SHARE COUNTERS BELOW POST TITLES ON POST PAGE.
11. 336x280 ADSENSE BOX BELOW POST TITLES.
12. RELATED POSTS MATCHING THE ORIGINAL THEME.
13. TAG SECTION - LITTLE DIFFERENT FROM THE ORIGINAL.
14. SUPPORTS MULTIPLE AUTHOR INFO WIDGET - CODING INCLUDED.
15. SIMPLE COMMENT SECTION & SEO OPTIMIZED.

I might have missed few in the list above because the list is quite huge. So, I suggest you to give it a try to experience the other unknown features hidden in it:) If you feel, few areas in the template need an improvement (for example, adding a smooth sliding back to top button), then post them via comments! I'm open to your suggestions and queries!


Note: The template is best viewed on Firefox. IE does not support CSS3. Although, there aren't too many CSS3 features involved in this template, I suggest you to view it on Firefox for a better view:)

Background Animations On Blogger Using Jquery

background-animation-blogger
Recently, I came across a website in which the header had an animated background - dynamically moving image. I thought, why not try to achieve a similar effect on blogger. I worked out the codes, to be honest, it was quite simple. So, in this article, I've explained the basic idea behind animating backgrounds using jquery. If you intend to apply the same effect on your header, then reach us via the services tab.

BACKGROUND ANIMATION ON BLOGGER - LIVE DEMO

I suggest you to take a look at the demo, by hitting the link above, before we dive into the tutorial. I've personally test the above effect on all major browsers that include, but not limited to, IE, FF, Chrome, Safari and Opera which simply ensures a perfect browser compatible view. So, what you waiting for? Just follow the instructions below and get them installed on your blog.

1. Navigate to "Design>>Edit HTML" and make a backup of your template by clicking on the "Download full template" link at the top of the page. Once the back up is over, search for the following piece of code.
]]></b:skin>
2. Just replace the above code with the following code present in the text document - SCRIPT AND CSS FOR BACKGROUND ANIMATION. The code in the text document contains the CSS and JavaScript required to run the animation. If you already have the main jquery file running on your blog, then remove the line which contains it from the text document. To remove it, just delete the following line from the text document.
<script src='http://ajax.googleapis.com/ajax/libs/jquery/1.6.2/jquery.min.js' type='text/javascript'/>
3. Next, place the following HTML tags anywhere on your template - possibly before/above <div id='content-wrapper'> (or) <div class='columns fauxcolumns'> (or) you may use them in the blogger post editor, just like I did in the demo link.
<div id="animate-area">
</div>
4. That's it! Save your template and your done!

I hope the tutorial was pretty simple to understand and work on. If you find any difficulties in getting the animation working, then leave a comment below and get it solved. As usual, share your opinions via comments below.

Simple Tips to Get More Comments on your Blog

This is a guest article written by Michael Scottsdale. If you wish to write one for us, then check out this page for guidelines - Write For Us. Are you having problems getting people to comment on your blog posts? It’s either your comment box isn’t working (which is highly unlikely) or you’re not hitting the right buttons. One of the most ignored ways of building steady readership on a blog is through the use of comment box.
fixing-comment-box
There’s simply no better way of gauging your blog’s health than by measuring the actual number of people who are not only reading your articles, but are actually providing comments and feedback. Below mentioned are few tips which might get your comment box going...

1. ASKING QUESTIONS
Good quality articles should be informative. But if it fails to tickle your reader’s imagination or leave them no avenue for questioning then your article has only been successful in educating which is good if you’re posting it on Wikipedia.

Asking questions at the end of the article is the most direct way of soliciting your reader’s comments or feedback. These should be easy to answer but refrain from using questions that could be answered by yes or no. Open ended questions offer your readers helps your readers express themselves more freely and is fosters a healthy environment for discussion.

2. QUALITY CONTENT
Everything starts with great content. Write on topics you feel strongly about or trending topics that elicit your reader’s opinions. However, this should be in line with your niche and placing political issues on a food blog is not a good idea.

Again, a little bit of creativity and research would help you come up with an interesting topic. Food blogs for example could talk about controversial diet programs or food cuisines that are entirely alien to their readers. The possibilities are limitless and only your imagination could stop you with coming up with a good topic. 

3. BEING PROACTIVE 
The best way to get the ball rolling is to open with your own comment. You could end the article with a question or immediately post a comment after the article giving your personal opinion on the subject. Other methods include sending emails to your readers informing them about the latest blog post and asking them how they feel about it.

4. MAKE COMMENTING EASY
Most of the websites that offer a comment box require readers to log in their personal information which could be a bit of a drag if you’re only planning to place a few words or phrases. Some blogs even oblige people to become fans or join the website before allowing them to comment.

Comments and feedbacks give you a deeper insight into what type of audience is reading your blogs. This is why making it easier for people to place their comments gives you a better look into what type of writing works for your blog. A simple opt-in box asking them their email address and user name is a good way of making commenting easier while protecting your blog from spam comments.

5. MAKE IT MORE REWARDING
Taking a hint from forums, making commenting worthwhile helps generate added interest among your readers. This could be done by allowing them to include links or a signature on their comments. Creating a top list of commenter’s and displaying it at the side bar for example is a wonderful way of showing that you appreciate and acknowledge their efforts. A personal email helps build trust and forge stronger relationships with readers.

6. COMMENT ON OTHER BLOGS
Another way of inviting people to write comments on your blogs and drive traffic is to become an active commenter yourself. Sharing your ideas with other blog owners and inviting them to visit and comment on your blog helps build stronger relationship with fellow bloggers.

So, let’s get the comment box working! Any more tricks to share?

Distortion Effect On Images Using CSS & Jquery

Distortion-effect
Inspired by few works from Ryan Florence - Mootools contributor and moo4q creator, I wanted to use few scripts from his animation library to create a stunning effect for users on blogger/WordPress(WP), namely "the distortion effect" on images using CSS and jquery. I've split the tutorial into 3 parts - HTML, CSS and JavaScript to keep it simple. So, take a look at the live demo using the link below.

DISTORTION EFFECT ON IMAGES - LIVE DEMO

CSS
1. Navigate to "Design>>Edit HTML" and make a backup of your template by clicking on the "Download full template" link at the top of the page. Once the back up is over, search for the following piece of code.
]]></b:skin>
2. Add the following piece of code just above/before the line mentioned in step 1.
a#homeLogo  {
  width:300px;
  height:233px;
  text-indent:-3000px;
  background:url(https://lh6.googleusercontent.com/-d6KcE0bYt7g/TmB-678StqI/AAAAAAAABiQ/8HiKcJYL3RY/s800/face-icon.png) 0 0 no-repeat;
  display:block;
  z-index:2;
}
a#homeLogo span {
  float:left;
  display:block;
  background-image:url(https://lh6.googleusercontent.com/-d6KcE0bYt7g/TmB-678StqI/AAAAAAAABiQ/8HiKcJYL3RY/s800/face-icon.png);
  background-repeat:no-repeat;
}
.clear { clear:both; }
Note: Users on WP may add the above mentioned codes to their custom.css file and upload the same to their host servers.
3. Change the URL highlighted in green with the image URL of your choice. Please, try to maintain the image dimensions - 300x233px, to avoid layout issues and further complications arising out of the same:)

JAVASCRIPT
Users on blogspot/blogger may follow the following instructions. To avoid excessive time in loading your website/effect on blogger, you shall define the JavaScript internally on your blog rather than calling them from Google Sites where I hosted them.
1. Search for the following piece of code in your blogger template.
</head>
2. Paste the following piece of code mentioned in the text document - JAVASCRIPT FOR DISTORTION EFFECT, just above/before the line mentioned in step 1.

WP Users may download the files - CSSAnimation.js, CSSAnimation.jQuery.js  & Demo.js (you may define them internally) and upload the same to their host servers to include them before </head> as mentioned earlier (similar to blogspot users). I recommend you to read the following articles to better understand about adding custom defined JavaScript on WordPress - Adding JavaScript on WordPress. I'm not a WP expert. So, if there are any WP geeks out there, you may share a small tutorial about adding these scripts to their respective hosts - either via comments or via guest articles:) 

HTML
The HTML involved behind the distortion effect is pretty complex to understand. So, to keep them simple, I've just added them to a text file which you may download here - HTML FOR DISTORTION EFFECT. Now, paste the code present in the text document anywhere in your blogger template or WordPress theme - better to add them as widgets. That's it! Save your template and your done. Replace the link which points to my website (http://www.newbloggingtipz.com)with that of yours. It's pretty self-explanatory.

The above effect was tested to work on all major browsers including, but not limited to, IE, FF, Chrome, Safari and Opera. If you need any assistance in adding this effect on your blog, then leave a comment below and get it clarified. Do share your opinions about the article via comments.

Blogger's Guide to Online Marketing - Darren's New ebook with 100% Money Back Guarantee!

Last night, I received an email from Darren Rowse regarding his new eBook launch about "Blogger's Guide to Online Marketing". He's been a great inspiration to me, as far as my blogging career is concerned. I have a copy of his first eBook. I enjoyed every bit of it - very useful to me and other budding bloggers. To be frank, the other releases did not impress me as much as the first one did. However, the recent one does. So, I'll soon get my hands on it. May be, you should try it as well...

Bloggers-Guide-to-Online-Marketing

WHAT'S NEW? WILL IT BE JUST ANOTHER EBOOK?
Darren has come up with a clear list of 31 chapters of his new eBook which provides a practical solution to convert your blog into a money making machine. Though I've not yet read the eBook, from the reviews I read, I feel this eBook would serve as a step-by-step guide for successful online marketing. Do you feel that's not enough for $49.99? Your pretty right! May be Darren felt the same too! 

To make your pennies worth, he provides an addition resource library that contains more than 20 documents, templates, worksheets and other examples to make you work on what you read. He provides you the resources that you need to work with. Ideally speaking, a spoon fed kit to create your own successful online business empire:) To get a detailed insight about the new eBook and the other features offered by Darren, just hit the following link - More About The Blogger's Guide to Online Marketing Kit

WRAPPING UP...
Well, as mentioned in the title of this article, the new eBook has a 100% money back guarantee offer - at the end of 60 days. Well, this clearly explains the amount of confidence on his material. So, you have nothing to lose. Just grab a copy of the new release either by clicking on the banner above or using the following link - Blogger's Guide to Online Marketing

The above discounted price is valid only till 23rd September, 2011. So, please grab your copies before he closes the (50% discount) offer.
[netinsert=0.0.1.11.14.1]