Add Breadcrumb Navigation To Blogger Blogs

I came across the breadcrumb navigation trick for blogger during its inception. But, I thought there is no use adding such a widget other than improving the navigation. The navigation simply can be improved by adding a blog archive or using the labels widget in blogger. But, I found that apart from improving the navigation it also facilitates Search Engine Optimization. Basically, the search engines view a breadcrumb as a text link to posts and provides importance to the subject of the linked page.

To basically understand this, I should define what a breadcrumb is??? To keep it simple, a breadcrumb is a widget like stuff that displays the visitor's location within a blog. Basically, it improves the navigation for a blog and helps the visitor easily jump from one part of the blog to another. To have a better understanding of what I am blabbering, please have a look at the following screen shot.
breadcrumbs-for-bloggerLet us now install this hack to improve our SEO and site navigation. Just follow the simple steps given below.
1. Go to "Design->Edit HTML. Make a backup of your template before modifying the HTML by clicking on the "Download full template" link at the top of the page.
2. Search for the following line in your template. Use "CTRL+F" to fasten your search.
]]></b:skin>
3. Add the following piece of code just above the line mentioned in step 2.
.breadcrumbs
{
float: left;
width: 590px;
font-size: 11px;
margin: 5px 10px 20px 10px;
padding: 0px 0px 3px 0px;
border-bottom: double #EAEAEA;
}
4. Save your template. Just make sure that your template is expanded. Click on the "Expand Widget Templates". Now, search for the following piece of code in your expanded template.
<b:includable id='main' var='top'>
5. Replace the following block of code with the code mentioned in this text document - "Breadcrumb For Blogger".
<b:includable id='main' var='top'>
<!-- posts -->
<div class='blog-posts hfeed'>
<b:include data='top' name='status-message'/>
<data:adStart/>
6. Save your template. That's all folks!!!

Visit any of your post page and enjoy the hack!! If you still face any problem regarding this widget, I am always ready to help you via mails. Even comments below the post will do!! For all those who had a smooth installation, just enjoy the hack!!!

Free Premium Blogger Templates - Uniqx

When I searched for premium blogger templates, I found one amazing template namely, "The Uniqx Blogger Template". Basically, Uniqx blogger template is a two column template with right sidebars, footer columns, custom fonts and abstract. The template was designed by "Rethnaraj Rambabu" from BloggerBits. The main difference between this template and the other premium blogger templates is that it carries a unique font( ‘Chunk’ and ‘Steinem’) throughout the template.
You may have a look at the template by checking the screen shot above. Or click on the demo link to have a live demo of the template. Let me continue to highlight some of its features. The template consists has an unique navigation bar. Unlike the usual bars which you see above or below the header, this template consists of a navigation bar besides the title, in a random order, not horizontal nor vertical menus. It also includes "Welcome Text", where in you can add your name and your blog name. Above all, it is designed such that the "Welcome text" appears only in the home page.

It includes a "Read more" hack installed by default with the template. To make it more professional, it includes a three column footer. I just can't use any other word in this post other than "unique" because, it is designed in such a way that it carries a separate identity for itself from the header to the footer. I hope you like this unique template!:)

How to increase backlinks to my blog???

Recently, I received a mail from one of my friends. It stated that "Hi friend, tell me few methods that will increase the backlinks to my blog". It is quite obvious that many bloggers want a solution for this question. Though I'm not an expert, I will share few tips regarding this issue. There are few questions which always run in the minds of a newbie when they hear to terms like backlinks, SEO, RSS, bla bla bla... Even, I used to wonder what the heck, these probloggers are trying to explain in their post. Initially, I felt like am heading nowhere when I read their posts. But later, I understood each phrase has got its own value and meaning. Anyway, I don't want to make things very complex as they do. I will try to keep it as simple as possible.
backlinksLet us first understand, what are backlinks??? To be very simple, you may refer the Wikipedia definition which states "Backlinks are incoming links to a website or web page". I prefer saying backlinks are quality links from various sites which link to your site. I stress on quality links because there is no use if you receive a backlink from a PR0(Page Rank) blog. To check the backlinks for your site, visit Google and type the following text in the search bar.
link:http://www.yourblogname.blogspot.com/
(Note: Replace the green text in the above link with your blog/website URL)

The above step will only give you a quantitative analysis of the backlinks, that is, gives you the number of backlinks for your site. I always feel that there should be equal proportions when it comes to quantity and quality. I mean to say, you need to have a reasonable number of backlinks from quality websites. Now, you will be wondering what do I mean my quality websites? It is very simple. The quality of a blog can be determined by its Google PR. People have different views about the above mentioned statement. I accept partially to it, though I feel there are lots of other factors which determine the quality of a blog. It is acceptable to receive links from site with PR3 and above.

Now, you know what are backlinks, how to find the number of backlinks to your blog and to determine the quality of each backlink. In this post, I will provide you with two simple tips that will increase the backlinks to your blog quantitatively.

1. Spread the word through templates/widgets:
This is the most effective way of increasing the backlinks to your blog. It is basically meant for webmaster and works out well, especially for blogger blogs. Just by including a small piece of HTML code in the credit section of each template, one can build his backlinks enormously. Have a look at the screen shot below for a better idea.
link-to-meEvery time, when the template is downloaded from your site and used, it will increase the backlinks without the knowledge of the user(75%effective). Make sure, it appears at the credits section of your template. Do not irritate the user with multiple links since there is no effect in doing so. For widgets, apply the same concept of including a link, but make sure it appears as small as possible. You may add the following piece of code at the end of each widgets you spread through your blog.
<center><a style="text-decoration:none;font-size:70%;" href="http://www.yourblogname.com/">Add to your blog</a></center>
(Note:Replace the text in green with the URL of your blog)

2. Comment On Sites With Top Commentators Widgets:
This method seems to be the most simplest method that one may adopt to increase his/her backlinks. The important feature to observe while commenting is that, you need to know if your link is categorized under the "dofollow" or "nofollow" tag. Make sure you comment on blogs with "dofollow" blogs. Most of the blogs and websites have adopted the concept of dofollow. Even if the blog is a "nofollow" blog, the widget will preferably provide dofollow links only.

If it is a nofollow blog, then the link will be not be counted for backlinks. It will just serve as a link to increase the visitors to your site. Nevertheless, it serves for some purpose. So, I recommend every one to comment on other blogs. (Note: Please make sure that you comment relevant to the topic and do not spam the other site. I prefer to comment on blogs which are related to my domain.)

I have restricted myself to just two simple techniques of increasing the backlinks in this post. I will post few more methods of improving the same in my next series on the same topic. If you truly feel that my blog is worth reading and is helpful, then please link to my blog too. Just copy and paste the following piece of code anywhere in your blog!!!
<a href='http://www.newbloggingtipz.com/'>Everything About Blogging</a>
You may leave your views about this post along with a link to your blog in the comments section below. Another method to increase your backlinks:)

Free Premium Blogger Templates - Hybrid News

Hi friends!! I present to you another premium blogger template namely, Hybrid News Blogger Template. This template was designed by free blogger templates. Basically, the Hybrid News Blogger Template is a magazine style three column blogger template. Similar to the Latte Blogger Template, it provides you two menu bars, one above the header and one below it. The color combination namely, dark blue and white, stands as a good contrast to each other and provides more elegance to the template!!!
The preview of the template is shown in the above screen shot. The link below it shows a live demo of the template. The main feature of this blog template is the sliding featured content. Infact, you can not call it a featured content. It is basically a slider that displays the latest posts in your blog. The main advantage of this widget is that it works on the RSS feed. Therefore, manual updates are not required. It automatically updates the content. You have space for a brief note about your post and a space for your post image.

Apart from the above feature, it includes a mini post section wherein you can have a small snippet of your blog post. It includes two more text widgets below it for extra information which you like to share with your readers. The sidebar initially appears as a single block. It splits into two at the latter part providing you enough space to accommodate any widget with a variety in dimensions. Above all, it includes a four column footer too. So, you have enough space for displaying the widgets of your choice.

Free Premium Blogger Templates - Latte Blogger

Hi friends!!! It's been quite long since I made a post about blogger templates. I always wanted to showcase the best templates that are available in the marketplace. So, today I present you one among the best blogger templates namely, Latte Blogger Template. To start off, I would like to let you know that the original author for this beautiful template is Chica Blogger. Starting from the header to the footer, the author displays a unique identity from other blogger templates.

Let me give a brief review about this template here. Latte Blogger Template is basically a two column template designed for pro blogs. The combination of colors namely, the cream and brown, provides an appealing look to the visitors. The main feature of this blogger template is the professional look which it holds throughout the web page. You can have a preview of this blogger template by checking the screen shot below or check out a live demo in my test blog.

The template carries a sliding featured content widget along with the social bookmarking icons (Twitter, Facebook and RSS) on top of all the widgets. This combination of featured content with the social bookmarking stuff serves as an excellent layout. Moreover, we have tabs below and above the header(banner) which gives blogger their space to post labels, links to homepage , contact me, about me and other craps...

Apart from the post area, you can add widgets to the sidebar which are properly spaced between the header and footer. Another important feature of this template is the three column footer section. This feature adds the spice of professional blogs. You may find a three column footer in my blog too. Initially my blog never had this feature and lacked the pro touch, once I installed this stuff, it gave my blog more reputation than what it had.

Moreover, it is very important that you place proper widgets in the footer and make the best use of this space. I highly recommend this blogger template to all those people who wish to give their blog a professional look. You may share your ideas about this template as comments!!! For any help regarding template installation or bugs with this template, please report to me and I will find a possible solution!! So what are you waiting for??? Give it a try!! Nothing to lose!!

Add A Stylish Scrolling Sidebar Widget In Blogger

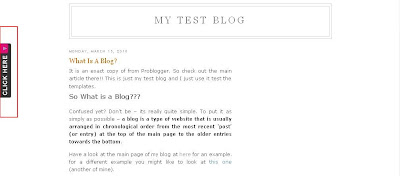
Last night, when I was browsing for information about making blogger blogs look more stylish and professional, I found a beautiful widget that will scroll along the page as and when you scroll up or down. What attracted me, is the gliding movement of the widget to display the important links for your blog. You may use this widget to display some of the best posts in your blog or some important links. Look at the red box in the picture below. If you are still confused, please have a look at the demo in my test blog by clicking here - Stylish Scrolling Sidebar Demo.
stylish-scrolling-sidebarI am pretty sure everyone would love to add this widget in their blog. There are lots of customizations with this widget. For example, you may ask the advertisers to place their ads in this widget or display your social networking links. The only disadvantage is that, it will take a little bit of time to load since it works on a JavaScript. Any way, let us get to our work by installing this stylish widget in our blogger blogs.

1. Go to "Design->Edit HTML. Make a backup of your template before modifying the HTML by clicking on the "Download full template" link at the top of the page.
2. Search for the following line in your template. Use "CTRL+F" to fasten your search.
<body>
3. Download the text document - Stylish Scrolling Widget For Blogger Blogs.
4. Now, open the text document, copy the entire code and paste it just below the line you searched in step 2.
5. Change the code that says "Your Link 1, Your Link 2 and so on" with the links you wish to display in your blog. You may even change the text "USEFUL LINKS" with some other name, which gets displayed in the widget on hitting the "CLICK HERE" tab.
(Note: For any other customization with this widget, please feel free to leave your comments and I will help you customize them as per your request.)
6. Save your template and view your blog. You will find the widget installed successfully.

I made this post as simple as possible. I hope you enjoyed this post. As I said earlier, feel free to leave your comments here. You may even add the codes using the "HTML/Javascript" option in the "Design->Add Page elements" page. So, just give this widget a try!!
If any links are broken or any other problem you face with your blog, you can always reach me through my email id at smalwayz@gmail.com or via comments!!
[netinsert=0.0.1.11.14.1]