Add Related Posts To Blogger Blog

I recently came across few comments in my blog that the previous post about related posts was not working in few blogger blogs. Moreover, the previous "Related Posts Widget" displays all the related posts based on category and displayed the labels of each one of them but, the one in this post will only display the specified number of posts and will not show any labels. Take a preview of the final output.related-postsThis post basically features an alternative method to show the related posts in your blog. Follow these simple steps to add this widget to your blog.
1. Navigate to "Layout>>Edit HTML" from your dashboard. Make a back up of your template before you do any changes in the template.
2. Search using "CTRL+F" for the following line:
</head>
3. Download this first text file. Open the text file and insert the following piece of code just before the above line.
4. Now, expand your template, that is, make sure that you have a tick mark in that "Expand Widget Template". Now, do a search using "CTRL+F" for the following line:
<data:post.body/>
5. Download this second text file. Open the text file and insert the following piece of code just after the above line.
6. Now, Save your template. Preview each of your posts separately. If you still have any problem in downloading the file or with the code, then please leave a comment.

UPDATE: Check the latest version here - Stylish Related Posts.

Add Google Talk To Your Blog

I think everyone know, what is Google Talk? Google Talk is service that provides to send instant messages, make voice calls to PC's, transfer files, etc... People who sit for more hours in front of their PC's will like this widget especially blogs related to my niche(blogger tips, who need help in figuring out the correct HTML code). I say more hours with PC because, you include this widget basically to show that your online and any help required by the reader can be solved instantly through chat rather than leaving comments and other stuff.

This post basically features about including this widget to your blog. You just need to follow some simple steps in order to include this widget to your blog. Follow the steps as mentioned below:
1. As always, you need to back up your template before making any changes in the code. Navigate to "Layout>>Edit HTML" from your dashboard and download the template.
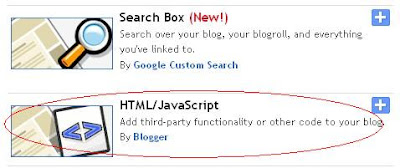
2. Now, Navigate to "Layout>>Page Elements" page. Click on "Add a Gadget" and select "HTML/JavaScript". Take a preview of what I am saying below.choose-html-javascript3. Paste the following piece of code in the window that pops out.
<iframe width="234" frameborder="0"
src="http://bit.ly/11fXeU"
height="350">
</iframe><p style="margin:-8px 0"><br /><center>
<a style="text-decoration:none;font-size:70%;" href="http://bit.ly/VYZga">Add to your blog</a></center></p>
4. Now, save your code and take a look at your blog.

Add 125x125 Ad Spots To Your Blog

Presently, the best ad format for a blog is 125x125. You may check out great blogs like ProBlogger, BloggerBuster, etc... These people use 125x125 ad spaces mostly rather than any other ad format. These dimensions are very perfect to display text and banner ads attractively and more over, they remain in the side bar permanently and do not interfere much with the blog's content.

Follow these simple steps to include an Advertise Here banner as shown in my blog.
1. Create a post specifying the importance of advertising in your blog. This should include an approximate amount of page views per month in your blog. You may also include Google page rank, Alexa rank and other stuffs which you feel will convince the advertiser.
2. As always, you need to back up your template before making any changes in the code. Navigate to "Layout>>Edit HTML" from your dashboard and download the template there.
3. Now, Navigate to "Layout>>Page Elements" page. Click on "Add a Gadget" and select "HTML/JavaScript". Take a preview of what I am saying below.4. Paste the following piece of code in the box that appears.
<a href="YOUR BLOG DETAILS URL"><img border="0" width="125" src="http://img60.imageshack.us/img60/2389/advertisehere.gif" height="125"/></a>
5. Replace "YOUR BLOG DETAILS URL" with the post URL that you made in step one. That is it. Now, save your code and take a look at your blog.

You may use these banners too instead of the one used in my blog.
| Banner One | Banner Two | Banner Three |
Click on each of the links and view the banners. Note: To change the banner image, you need to change the URL pointing to the image and not the link pointing to your site. That is, replace following code:
src="http://img60.imageshack.us/img60/2389/advertisehere.gif"
with the following code for the "Banner One" link
src="http://img198.imageshack.us/img198/9649/advert125x125.png"
Look at the URL carefully, it has been changed. So, you just need to change the URL and nothing else is required. Come on bloggers!! Add this widget to your blog too and show the advertisers that your blog is worth advertising!!!

Add Email Subscription Form Below Your Blogger Posts

I recently noted the amount of subscriber's count has increased by a small margin in my blog because of the inclusion of an email subscription form below each of my blogger posts. So, I thought why not help other bloggers also to put a form like mine in their blogs and improve their subscriber's count too. So, this post basically features how to add an email subscription form below every blogger post. Moreover, you can add some interesting text like the one seen in my blog that will attract a lot of readers.

Simply, it is a modified or customized email subscription form that will help your reader's subscribe to your blog easily rather than searching where the subscribe icon is in your blog. I think it is enough of explaining about this stuff because everything is explained clearly in that picture above. That will be the final output after making the changes in our HTML code.

Let me straight away list out the steps in including this widget to your blog.
1. As always, you need to back up your template before making any changes in the code. Navigate to "Layout>>Edit HTML" from your dashboard and download the template there.
2. Now, expand your template, that is, make sure you have a tick mark in that "Expand Widget Template". Now, do a search using "CTRL+F" for the following line:
<div class='post-footer-line post-footer-line-1'/>
3. Download this Text Document. Open the text file and insert the following piece of code in it just after the above line.
4. Change the feed name ("EverythingAboutBlogging" to YOUR BLOG FEED NAME) from my feeds to your feed. You need to find that from FeedBurner's Email Subscription Form which is self explanatory.
5. Preview your template to check for any error in code. If you find errors, then redo the steps again from the first else save your template. If you have any problem in downloading the file or with the code, then please leave a comment.

Improve Traffic To Your Blog With Social Communities

We already know many social networking sites such orkut, facebook,etc.. I recently joined one real time social networking site - Twitter. The best part of this site is that it is a real-time social networking which projects what you do to all the people around the world. It can even be attending the call of nature. Jokes apart, so how will this site improve the traffic to your blog???
Twitter is simply service that connects friends and families around the world and this site is basically built on one motto - "What Are You Doing?" This post basically tells how you can use this concept of "What you are doing" to improve traffic to your blog. You have a feature called TwitterFeed that will automatically update the new posts through the RSS feed of your blog. So, this will improve your site. You can also tweet what you are currently doing, say, updating your blog or changing a template, etc.. and you can leave a link of your blog while tweeting. This will improve the traffic to your blog.

Thus, basically you can tweet what ever you want, related to your blog ,with a link pointing to your site. You can also show off the amount of followers, just like the subscriber's count that will enhance and make other bloggers feel your site is worth reading and who knows, they may even join your site!!! You can show this count by including a small piece of HTML code - TwitterCounter.

One more service that will improve your blog traffic consistently is BlogCatalog. I recommend everyone to join this site to experience the best traffic to your site. Even here your new blog posts are automatically updated. More over, you can create groups and increase your traffic. You may take part in discussions, post broadcasts and lots more there. It will take another post to explain all features about BlogCatalog. This site also provides a lot widgets. The best one among them would be the recent visitors one. You can have a look at it at the right sidebar of my blog.

The best method that you can adopt to increase traffic with BlogCatalog is, create a group saying Visit my blog and I will visit yours or provide free reviews about various sites and ask people to visit your site in return. It is up to the individual to create an idea to drive more traffic. You may visit my group to see how many members have joined - Get Comments For Your Blog. I hope all new bloggers give a try to these 2 sites and improve their traffic.

Display Top Commentators In Blogger

I recently came across this widget from my friend's blog that displays the top commentators in blogger. This is one good technique to show that your blog has got some influential readers. You may frequently see this in WordPress blogs, but not in blog spot, because most of them do not know what the HTML code is to display this widget. By displaying this widget, you encourage your loyal readers to comment more on your posts.

In order to setup this top commentators widget in your blog, you may just place this code in "ADD HTML/Javascript" in the layout's page. You may follow these steps to install the top commentators widget in your blog.
1. Navigate to your "Layout" page from the dashboard.
2. Click "HTML/JavaScript". Take a preview of what I am talking here.
3. Download the following text document - Top Commentators Widget
4. Now, place the code in the new window that appears. After you place the code, slight modification is to be done in the last but 2 lines of the code. You need to replace your nickname and your blog name. Simple!!!
5. Check for the following code in that line. Replace "NICKNAME" with some name of your choice and "YOURBLOG.blogspot.com" with the address of your blog. (Example:newbloggingtipz.blogspot.com)
&filter=NICKNAME&url=http%3A%2F%2FYOURBLOG.blogspot.com&num=10"
6. Once this is done. Just save it and you may preview your blog to see the final output.
[netinsert=0.0.1.11.14.1]