Free Premium Blogger Templates - Latte Blogger

Hi friends!!! It's been quite long since I made a post about blogger templates. I always wanted to showcase the best templates that are available in the marketplace. So, today I present you one among the best blogger templates namely, Latte Blogger Template. To start off, I would like to let you know that the original author for this beautiful template is Chica Blogger. Starting from the header to the footer, the author displays a unique identity from other blogger templates.

Let me give a brief review about this template here. Latte Blogger Template is basically a two column template designed for pro blogs. The combination of colors namely, the cream and brown, provides an appealing look to the visitors. The main feature of this blogger template is the professional look which it holds throughout the web page. You can have a preview of this blogger template by checking the screen shot below or check out a live demo in my test blog.

The template carries a sliding featured content widget along with the social bookmarking icons (Twitter, Facebook and RSS) on top of all the widgets. This combination of featured content with the social bookmarking stuff serves as an excellent layout. Moreover, we have tabs below and above the header(banner) which gives blogger their space to post labels, links to homepage , contact me, about me and other craps...

Apart from the post area, you can add widgets to the sidebar which are properly spaced between the header and footer. Another important feature of this template is the three column footer section. This feature adds the spice of professional blogs. You may find a three column footer in my blog too. Initially my blog never had this feature and lacked the pro touch, once I installed this stuff, it gave my blog more reputation than what it had.

Moreover, it is very important that you place proper widgets in the footer and make the best use of this space. I highly recommend this blogger template to all those people who wish to give their blog a professional look. You may share your ideas about this template as comments!!! For any help regarding template installation or bugs with this template, please report to me and I will find a possible solution!! So what are you waiting for??? Give it a try!! Nothing to lose!!

Add A Stylish Scrolling Sidebar Widget In Blogger

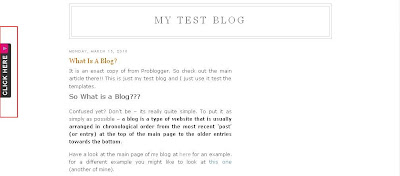
Last night, when I was browsing for information about making blogger blogs look more stylish and professional, I found a beautiful widget that will scroll along the page as and when you scroll up or down. What attracted me, is the gliding movement of the widget to display the important links for your blog. You may use this widget to display some of the best posts in your blog or some important links. Look at the red box in the picture below. If you are still confused, please have a look at the demo in my test blog by clicking here - Stylish Scrolling Sidebar Demo.
stylish-scrolling-sidebarI am pretty sure everyone would love to add this widget in their blog. There are lots of customizations with this widget. For example, you may ask the advertisers to place their ads in this widget or display your social networking links. The only disadvantage is that, it will take a little bit of time to load since it works on a JavaScript. Any way, let us get to our work by installing this stylish widget in our blogger blogs.

1. Go to "Design->Edit HTML. Make a backup of your template before modifying the HTML by clicking on the "Download full template" link at the top of the page.
2. Search for the following line in your template. Use "CTRL+F" to fasten your search.
<body>
3. Download the text document - Stylish Scrolling Widget For Blogger Blogs.
4. Now, open the text document, copy the entire code and paste it just below the line you searched in step 2.
5. Change the code that says "Your Link 1, Your Link 2 and so on" with the links you wish to display in your blog. You may even change the text "USEFUL LINKS" with some other name, which gets displayed in the widget on hitting the "CLICK HERE" tab.
(Note: For any other customization with this widget, please feel free to leave your comments and I will help you customize them as per your request.)
6. Save your template and view your blog. You will find the widget installed successfully.

I made this post as simple as possible. I hope you enjoyed this post. As I said earlier, feel free to leave your comments here. You may even add the codes using the "HTML/Javascript" option in the "Design->Add Page elements" page. So, just give this widget a try!!
If any links are broken or any other problem you face with your blog, you can always reach me through my email id at smalwayz@gmail.com or via comments!!

Add A Flashing Message To Your Blogger Blog

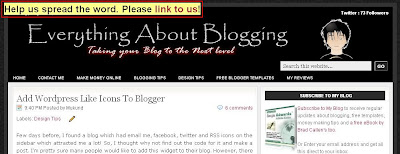
Hi friends!!! I recently found few websites that display a flashing message in their blogs asking for a link to their blog or a subscribe me widget. So, I thought why not help my blog readers do the same. Although the coding was actually done by Dynamic Drive in the name "Always On Top Message", I would like to help the newbies install this simple hack on their blog to display any message of their choice. Take a look at the following picture for better understanding.
flashing-message-on-bloggerFew suggestions for the messages that could be posted in the space are links that will ask the visitors to link to your blog(already installed in the script) or ask the visitors to subscribe for your blog or a simple welcome note. There is no limit. You can post anything below the sky to gain the first and the best impression from the visitors. Now, let us install this script in our blog.

1. Go to "Design->Edit HTML. Make a backup of your template before modifying the HTML by clicking on the "Download full template" link at the top of the page.
2. Download the following javascript - Top Message.
3. Open the file with a simple word pad. Now, edit the various options which are clearly explained in the comments. Any message can be included other than the "Link To Us" which is installed by default on the script.
(Note: Please do change the URL saying "YOURBLOGNAME.blogspot.com" with your blog URL for the default case on the script.)
4. Once you make the changes in the file, save it and upload it to a free hosting site. I use Google Sites. You may try the same or may be Fileave.
5. The last step will be to call this uploaded script to your blog.
Just paste the following piece of code above the </head> in your template.

<script src="http://www.yourdomain.com/topmsg.js">
//Always-on-top message Script- © Dynamic Drive (www.dynamicdrive.com)
//For full source code, and Terms Of use, visit dynamicdrive.com
//This credit MUST stay intact for use
</script>
6. Now, just save your template and view your blog. Still if you face any problems, then you may contact me via email and I will sort out your problems. Or just leave a comment here and I will help you!! Hope you enjoyed this hack. Seen you soon in my next post!!

Add Wordpress Like Icons To Blogger

Few days before, I found a blog which had email me, facebook, twitter and RSS icons on the sidebar which attracted me a lot! So, I thought why not find out the code for it and make a post. I'm pretty sure many people would like to add this widget to their blog. However, there is one small problem with this code, the animation like stuff works only with Mozilla Firefox but, not in IE (especially the older version, that is, 6.0). If you are still wondering how that widget would look, take a look at the following picture.
Wordpress-Icons-For-BloggerI hope you are pretty clear with what I was blabbering for quite sometime. Any way, now let us get to our work by adding this stuff in our blogs. Follow the simple steps given below.
1. Go to "Design->Edit HTML. Make a backup of your template before modifying the HTML by clicking on the "Download full template" link at the top of the page.
2. Now, search for the following line in your template. Use "CTRL+F" to fasten your search.
]]></b:skin>
3. Download the following text file namely, CSS For Icons. Once, the download is complete. Open the text document and paste the code in it just above the line mentioned in step 2.
4. Again, do a search for the following line in your template.
<div id='sidebar-wrapper'>
5. Paste the following piece of code just after the above mentioned line.
<div align='center'>
<div id='subscribe'>
<ul class='subscribe_icons'>
<li class='subscribe_twitter'><a href='http://twitter.com/YOURUSERNAME' rel='nofollow' target='_blank'>Twitter</a></li>
<li class='subscribe_facebook'><a href='http://www.facebook.com/YOURUSERNAME' rel='nofollow' target='_blank'>Facebook</a></li>
<li class='subscribe_rss'><a href='http://feeds2.feedburner.com/YOURFEEDNAME' rel='nofollow' target='_blank'>RSS</a></li>
<li class='subscribe_email'><a href='http://feedburner.google.com/fb/a/mailverify?uri=YOURFEEDNAME&loc=en_US' rel='nofollow' target='_blank'>Email</a></li>
</ul>
<div class='clear'/>
</div>
</div>
6. Please edit the text mentioned in green color namely, "YOURUSERNAME" and "YOURFEEDNAME" with your user names and feed names respectively. Hope, that is self explanatory.
7. Final step. Save your template. That's all folks!!!

If you still need help in adding this widget, feel free to leave a comment and I will help you solve your problem!! See you soon in my next post with some more interesting tips and tricks...

Get Verified In PayPal Without Credit Card

I hope people blogging in India and worldwide know about PayPal. If they don't, PayPal is simply a bank that provides you an account online or in other words, they serve as an intermediate between the advertiser and the publisher to store money online with which, you can shop online or withdraw to your bank accounts as real cash. So, sign up with PayPal now and start earning money online!!!
PayPalRecently, I used had to withdraw some money to my bank account and when doing so, I came to know that I reached the credit limit($500). I had to lift the limits, in other words, increase the limit so that I can withdraw the amount to my bank account. However, the process of getting verified in PayPal in India required a credit card. I never had one simply because, I am still doing my studies. But now, the problem of getting verified in PayPal has become so easy. You don't require a credit card. Just a bank account in India.

Now, let me tell you how to get verified within 48 hours without a credit card.
1. You need to login to your dashboard.
2. Click on the get verified button which you can find as link above the account balance, that is, your status would say unverified. Click the link near it to get verified.
3. If you had already added a bank account, then choose to deposit add two small amounts to your bank account and proceed.
4. After one or two days, check out your bank pass book or the account book, you will have two small amounts deposited in it.
5. Just write the amount that you got in the window that asks for the amount deposited. Enter the amount and proceed with the subsequent window. That's all folks!!!

Your account will be verified and the limits will be removed. Now, you can send/withdraw unlimited amount with your PayPal account. You may even become a golden member in NeoBux. Learn how to make money online with NeoBux by clicking here: How to make money with NeoBux??? There are lots of advantage being a verified member. So, get yourself verified with PayPal now!!! If you still face any problem, just visit this link Get Verified Today.

How to increase the page rank of my blog?

Few days before, I had a chat with my fellow blogger and he asked me, "How to increase the page rank of my blog?" I knew this question will definitely be running in your mind and every other young bloggers. Is it possible to increase my PR?? The answer to the question is "Yes, it is possible to increase the PR through routine work and updates, but cannot have an overnight increase." Now, what do I mean by routine work and updates? The answer lies in this post. Have a glance and you will understand.
about-google-pagerankBasically, page rank of your site depends upon your site's back links. When a blog or website with higher page rank than yours link to your site, I am sure in the next PR update you will find an increase in your page rank. Thus, it is very important to get your site linked to sites that possess higher page rank than your site. Some of the other techniques that you need to adopt for increasing your page rank are discussed below.

1. PROPER SEARCH ENGINE OPTIMIZATION:
The initial step to increase your blog page rank would be to set your blog as per the search engines want. I have already discussed about this in detail in my previous blogger posts. Check out the post by clicking on the link here : How to improve your Google PageRank?

2. PROPER BLOG COMMENTING:
This method is most effective and you play a significant role in it. You have to comment on blogs that allow "Do Follow". If you comment on "No Follow" blogs, it serves for no use. It is important to comment on blogs that have higher page rank. I recommend Comment Kahuna, which I started using few days before and it pretty easy to comment and find blogs related to our niche.

3.DIRECTORY SUBMISSION:
The next effective method of improving your page rank is to submit your blog to all the directories that are available. Never invest any amount in submissions, that is, do not pay for any services. I recommend you to personally submit your site to all the free directories that are available. Get the free list of web directories here : Free Directory List.

4.MAKE INTERNAL LINKS:
This is one of the most simple techniques that one can adopt to increase his/her page rank. Just provide a link from one post to another. You may check this post, for example, I linked my previous post about page rank in the first point. This will definitely increase your page rank. More over, it increases the page views for your site.

I hope these tips help you increase your page rank. If you got some other tip, feel free to leave your comments.
[netinsert=0.0.1.11.14.1]