YouTube Introduces Video Edits With Cool New Features

youtube-features
YouTube has introduced new editing features this week. This allows users to edit their already uploaded videos and the videos will retain the same video IDs so that the counts and comments are not lost. All the links remain the same as well. The user has to click on the “Edit Video” button on his video’s page or the My Videos page. This feature enables the user to edit the videos in a shorter time frame.

YouTube wants that, the users be given the ability to polish their videos and the edit feature is part of that initiative. A majority of the YouTube videos are rough amateur footage and this will give the amateur enthusiasts to add a touch of professionalism to their work.

The Edit option enables the user to stabilize hand-held footage, rotate the videos and enhance the colors and contrast. There is an “I’m Feeling Lucky” feature as well that enables one click color correction. Moreover, you can easily convert your 2D videos into 3D with just a click. There are lots more features apart from those mentioned here. So, login to your You Tube account and look for the Edit option on your dashboard.

The team has worked with the Picnik (the online image editing tool) team which Google acquired last year to add artistic effects that enable the user to add filters such as black and white and cartoon effects to the videos. The user can even swap the audio and can chose from a selection of available tracks. The user has the option of trimming the video as well if it is too lengthy at the beginning or the end.

Once the editing is complete, the user can click on the save button and the processing will start. If you are not happy with the results, you can go back to the original version. There is an option to of saving multiple versions as well. But videos that have more than 1000 views or third party content, can only be saved in the new version.

Queryads Review – Another Adsense Alternative

Queryads
People say, days of Pay Per Click (PPC) ads are gone but I personally feel that, even those who say that make the maximum out of PPC ads only. In other words, it is still the best method to make money online – predominantly using Adsense or other alternatives to Adsense. So, I sat down last night to find a quality Adsense Alternative and I ended up with this website called “Queryads”.

Queryads provides publishers PPC ad block similar to Adsense to make money online. From the reviews around the web, I found that their ads are relative to a website’s content unlike other alternatives. For example, if you run a website about food, the ads are predominantly oriented to food. Well, this is the most important criteria that a publisher should look out for.

Secondly, as a publisher, you should look out for the speed with which the ad blocks load and I feel it is certainly quick when compared to other alternatives. Moreover, it is compatible with Google Adsense. In fact, you can insert your Adsense ID to avoid repetition of advertisements – something that many alternatives do not care about.

You earn 70% of the revenue that you generate – the remaining 30% is absorbed by query ads as commission. The minimum payout to withdraw your earnings is $10.00 (seriously way too low) and you can maximize your earnings via affiliate sales by referring, both advertisers and publishers. You’ll earn 10% as a commission for every amount that the advertiser (the one you referred) spends on queryads or when a publisher generates income via queryads.

As an advertiser, I don’t have much expertise about the same. However, from the perspective of an observer on their site (watching the video and other stuffs), I feel you might get quality publishers to advertise your product. Moreover, you get 100 free visits initially – so, you may give them a try. You may refer to the FAQ page for further details - Queryads FAQ.

To wrap up, as a publisher, I feel this is a better alternative to Adsense - definitely not the best. Nevertheless, it's free! So, what you waiting for? Just sign up for free and try their service. Later, share your opinions via comments below.

Add 3D Text Effect Using CSS On Blogger

3d-text-effect-blogger
Inspired by the effect on David DeSandro's footer, I worked out the CSS behind his three dimensional text effect. Well, in this article, you'll be able to get a similar effect on your blogspot blog. The normal state shows the text with a black shadow and on hover, you get to see a colorful text with colorful shadow. Take a look at the live demo using the link below to better understand about the same.

3D TEXT EFFECT ON BLOGGER - LIVE DEMO

ONE-CLICK INSTALLATION TOOL FOR NEWBIES
The recent entries on my blog had the one click installation tool and I've incorporated the same in this article as well. I recommend the newbies to follow this method whereas the experts/webmasters can follow the detailed procedure. Firefox 3.0+, IE 9.0 and Opera are some of the browsers that support the one-click installation method. So, make sure your browser is one among them and hit the following button to install the 3D text effect on your blog.


DETAILED PROCEDURE FOR WEBMASTERS
1. Navigate to "Design>>Edit HTML" and make a backup of your template by clicking on the "Download full template" link at the top of the page. Once the back up is over, search for the following piece of code.
]]></b:skin>
2. Paste the code present in this text document - CSS FOR 3D TEXT EFFECT, just above/before the the line mentioned at step 1.
3. Now, paste the following codes anywhere in between the opening and closing of body tags on your template.
<div id="animationWrapper">
  <a href="EXAMPLE URL">
    <span class="span1">Sample</span>
    <span class="span2">Example</span>
    <span class="span3">Effects</span>
    <span class="span4">Blogger</span>
  </a>
</div>
Ideas: You may add this 3D effect to display your blog title or post title or show off your links at footer similar to DeSandro's blog. The choice is left to the individual.
4. That's it! Save your template.

CUSTOMIZATION COMMON TO NEWBIES AND WEBMASTERS
Replace EXAMPLE URL in the coding with the URL of your choice and correspondingly, replace the text that runs between the span tags with that of your choice. Further customizations include changing the font size, color and its type - just play around with the CSS to change these customizations. Hit me via comments if you need assistance in doing so. 

The above effect was tested to work perfectly fine on all the major browsers that includes, but not limited to, Firefox 3.0+, IE 9.0, Opera and Safari. I hope you enjoyed this tutorial. Share your opinions via comments!

Devil's Workshop Template Customization - Part 1

stay-connected-tut
I've been receiving a lot of positive reviews and feedback about the Devil's Workshop blogger template - the load time being appreciated the most. If you did not find to check out the template, then I highly recommend you to spare some time to check it out - DW Blogger Template. I've planned to share the "Stay Connected" widget code in this article.

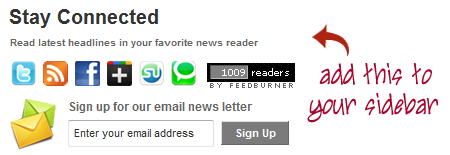
This widget namely "Stay Connected" is a subscription box that is most essential for any blog . The widget is a slightly modified version from the original one. I've tried to add the latest networking icons like Google+ to stay updated and to better connect with the users. You may preview the same on the demo blog by hitting the following link - DW Template Live Demo (or) just take a look at screen shot posted below.
stay-connected-widget
ONE CLICK INSTALLATION
Just install the widget "Stay Connected" using the install button below, provided your browser is either one of these - Firefox 3.0+, IE 9.0 (or) Opera. I'm not sure about Chrome and Safari, because I heard that it works for few, whereas it shows an error for the rest.

THE USUAL PROCEDURE
If you are unable to install the widget using the button, then navigate to "Design >> Page Elements" page from your blogger dashboard. Choose "Add a Gadget >> HTML/JavaScript" and just paste the entire code in this text document - STAY CONNECTED WIDGET CODE, on the new window that pops up. Name the title of the widget as "Stay Connected". That's it!

COMMON CUSTOMIZATION
Once you've installed the widget on to your sidebar - be it via one click installation method or the usual procedure, make sure you customize the widget as per the instructions given below, before you save them.
  1. Replace FEEDNAME at various instances (5 instances) in the code with your feed name. The title of your FeedBurner feed serves as the feed name of your feed. So, login to your feedburner account and look for the feed title.
  2. Replace TWITTER-NAME at one instance in the code with your twitter user name.
  3. Replace FACEBOOK-URL at one instance in the code with your fan page URL on Facebook.
  4. Replace GOOGLE-PLUS-URL at one instance in the code with your Google+ Profile URL.
  5. Note: If you don't have one, then leave your email via comments asking for an invite and I'll invite you to Google+ so that you can enjoy the new social networking, just as we do.
  6. Replace HOMEPAGE-URL at two instances in the code with the home page URL of your blog.
I'll continue to post other tutorials about customizing Devil's Workshop Blogger Template in the upcoming weeks. Stay tuned to my blog so that, you don't miss out any customization.Do share your opinions about this article via comments:)

Fixing Common Template Errors On Blogger

blogger-error
I realized that I had gone too much into designing widgets, losing track of the basic stuffs which drove a lot of traffic to my blog - those articles and tutorials which helped the newbies solve their common problems. With that being said, I plan to post articles and refresh on topics that are already existing on my blog with a better view and knowledge about them in the upcoming weeks.

In this article, I plan to provide solutions for the most commonly encountered template problems on blogger. I guess webmasters shall find this article way too silly but, I'm sure this is a life saver for many newbies out there. I'll just list out the problems, as it appears on the dashboard, when you try to make a change on your blogger template. Obviously, solutions shall follow below them:)

Most commonly encountered problem on blogger - "Your template could not be parsed as it is not well-formed. Please make sure that all XML elements are closed properly." This error message is usually accompanied by another message that indicates the actual reason for this reason. Hence, you should watch out for the next statement which may be one among the following.

XML error message: The entity name must immediately follow the '&' in the entity reference.
SOLUTION: Just look out for the place where you modified the codes on your template. I'm sure you'll find the following symbol - &, somewhere in the newly inserted code. Just add amp; to the right of the symbol or in other words, suffix amp; with that symbol to fix the error.

XML error message: Open quote is expected for attribute "{1}" associated with an element type "href".
SOLUTION: The element type may be src or type or class or id or anything for that matter - not necessary that it should always be href. Well, it is pretty simple to solve this one! You just missed an a quotation mark some where in the code. Consider the example below.
<a href=http://abc.com">Example</a> should become <a href=''#">Example</a>

XML error message: The element type "img" must be terminated by the matching end-tag "</img>"
SOLUTION: This error occurs when you miss out a trailing slash ( / )that should appear before you close the img tag. This could be better explained with an example as shown below.
<a href=''source link"><img src="img link"></a> should be changed to
<a href=''source link"><img src="img link"/></a>

More than one widget was found with id: HTML1. Widget IDs should be unique.
SOLUTION: This occurs when the id name is found to the same at two instances. Just change the id name to solve this issue. For example, from id='HTML5' to id="HTML57" - a unique name that does not appear anywhere on your template.

We were unable to save your template. Please correct the error below, and submit your template again. There should be one and only one skin in the template, and we found: 2
SOLUTION: Simple! You defined two different skins on your template. Make sure you delete one and the problem should be fixed - occurs at very rare instances. But, it does happen:)

bx - xxxxxx error
SOLUTION: You'll find bx followed by some number when you try to save your template - usually occurs when you try to shift tabs between "Page Elements" and "Edit HTML". Just make sure you save your widgets at their respective positions before you shift the tabs to avoid this error. Clearing your browser cookies might help sometimes. Saving your template by manual deletion/removal of widgets using "Page Elements" section is better than using the wrench icon to delete them - avoids the errors.

Well, only few errors are mentioned in the article above. There are plenty of errors which you might have encountered. Just share them via comments - possibly with their solutions as well. If not, just post the error you encounter and I'll try to fix it up for you!

Increase or Decrease Your Font Size On Blogger Dynamically - The Text Resizing Widget

resize-fonts
I've been constantly trying to provide unique articles for blogger/blogspot blogs. With the same motto in mind, I've got yet another interesting trick today wherein you can re-size (both increase or decrease) the size of your texts dynamically. I suggest you to take a look at the live demo using the link below to better understand about the same.

DYNAMICALLY RE-SIZE THE FONTS ON BLOGGER - LIVE DEMO

I guess you understood what do I mean changing layouts dynamically.Wondering, why should I use this? Pretty simple! Your blog shall be read by people from various age groups. Few might feel it comfortable to read the articles on your existing font/text size while few may find it difficult - especially the old age group. Hence, you shall add few lines of a JavaScript to satisfy every reader on your blog, by providing him/her the ability to customize the visual appearance of your blog. Interesting... Isn't it?

FOR NEWBIES - ONE CLICK INSTALLATION
Warning: The one click installation button works only on Opera, Firefox 3.0+ and IE 9.0! So, if you are using any other browser, then please skip this method and scroll down to install the widget using the alternate method - the one explained for web masters.

Without wasting your time, let me dive into the tutorial. I've created a simple one click installation button, as shown below, by which a widget shall be added to your blog so as to change the font size dynamically. It's specially targeted to newbies and those who hate playing with codes, unlike me! 


On installing the widget, you will notice the following text - CONTENT GOES HERE, appearing on your blog. Just replace CONTENT GOES HERE with the content of your choice and your done! You should be able to make your text bigger or smaller by clicking the respective links mentioned in the widget.

Note: By opting for this method, you will be able to increase or decrease the text that lies in the widget - those lines which you replaced with CONTENT GOES HERE. In other words, the content between the div id and div.

FOR WEBMASTERS - A LITTLE COMPLEX PROCEDURE
1. Navigate to "Design>>Edit HTML" and make a backup of your template by clicking on the "Download full template" link at the top of the page. Once the back up is over,  expand your blogger template and search for the following piece of code. Use CTRL+F to speed up the search.
<div class='post-body entry-content' >
2. Just add id='wrap-content' along with the div tag mentioned at step 1, that is, next to class='post-body entry-content'. So, your final tag should be similar to the one shown below.
<div class='post-body entry-content' id='wrap-content'>
3. Save your template and move to the "Design >> Page Elements" page.
4. Choose "Add a Gadget >> HTML/JavaScript". Now, paste the following codes in the text document  - TEXT RESIZING SCRIPT, in the window that pops up (fill the content part - not the title). You may add a title to the widget or you may leave it blank - the choice is yours.
5. Well, that's it! Save your widget and your done!

Note: By following the complex procedure, the font size of your articles, be it the one on the homepage or the post page, will increase or decrease unlike the ones using the widget version. To understand the difference, try both the methods:)

The biggest advantage with this script is that, it works independently and does not require a jquery library file, unlike the other tutorials on dynamically changing layouts on blogger - Changing Backgrounds and Adaptable View. Just few lines of script will do the magic. Tested to work on all major browsers. Compatible with all the blogger templates - be it the customized ones (or) the default blogger themes.

Well, I would like to know whether you enjoyed the one click installation tool in this tutorial or not? I'll probably try to use them more often than not in the upcoming articles so that, even the newbies can enjoy the various effects posted on my blog. Anyways, share your opinions about the article via comments! We love to hear from you:)
[netinsert=0.0.1.11.14.1]